Setting up a Private Retrieval Augmented Generation (RAG) System with Local Llama 2 model and Vector Database
Oct 3, 2023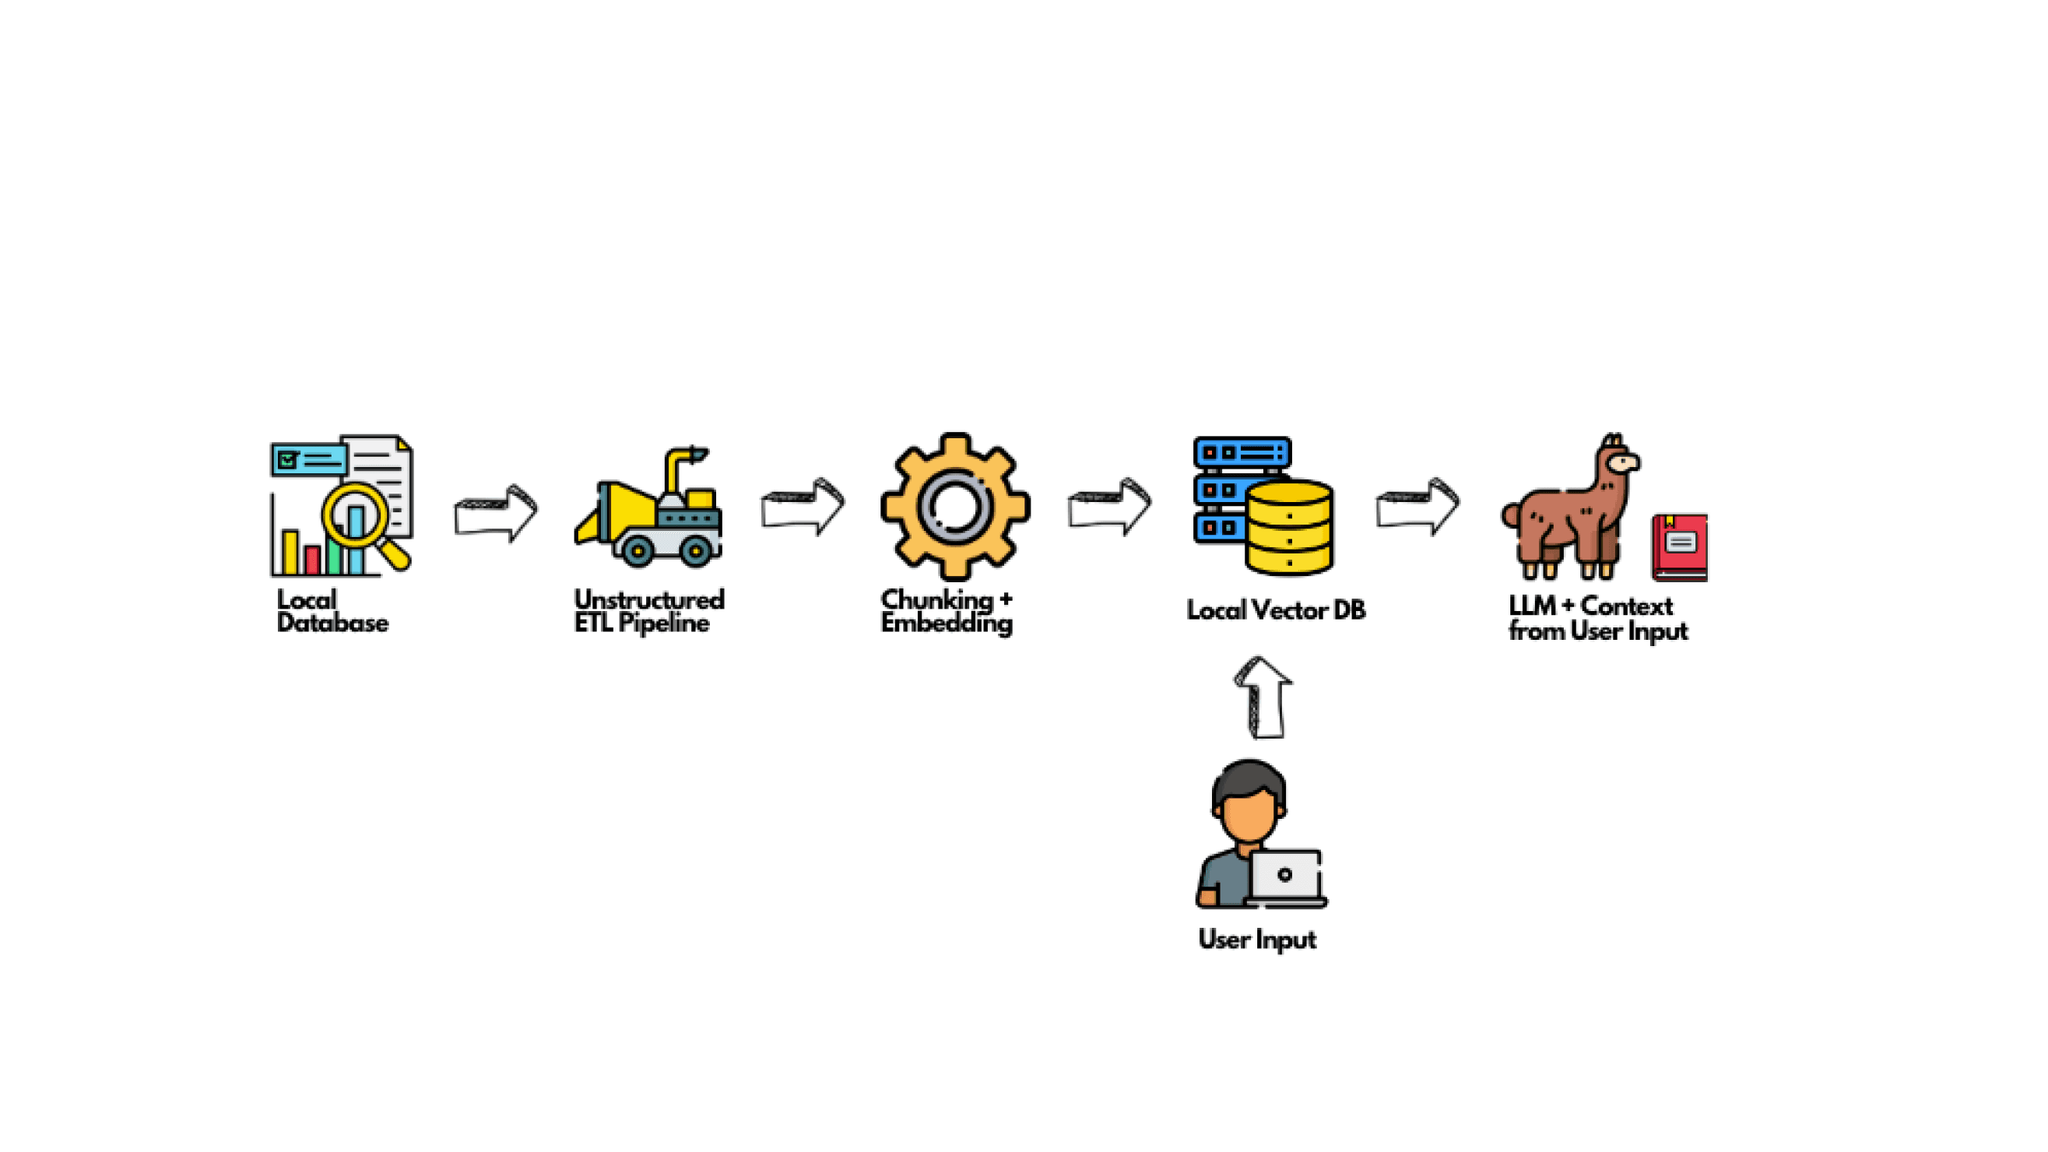
Authors

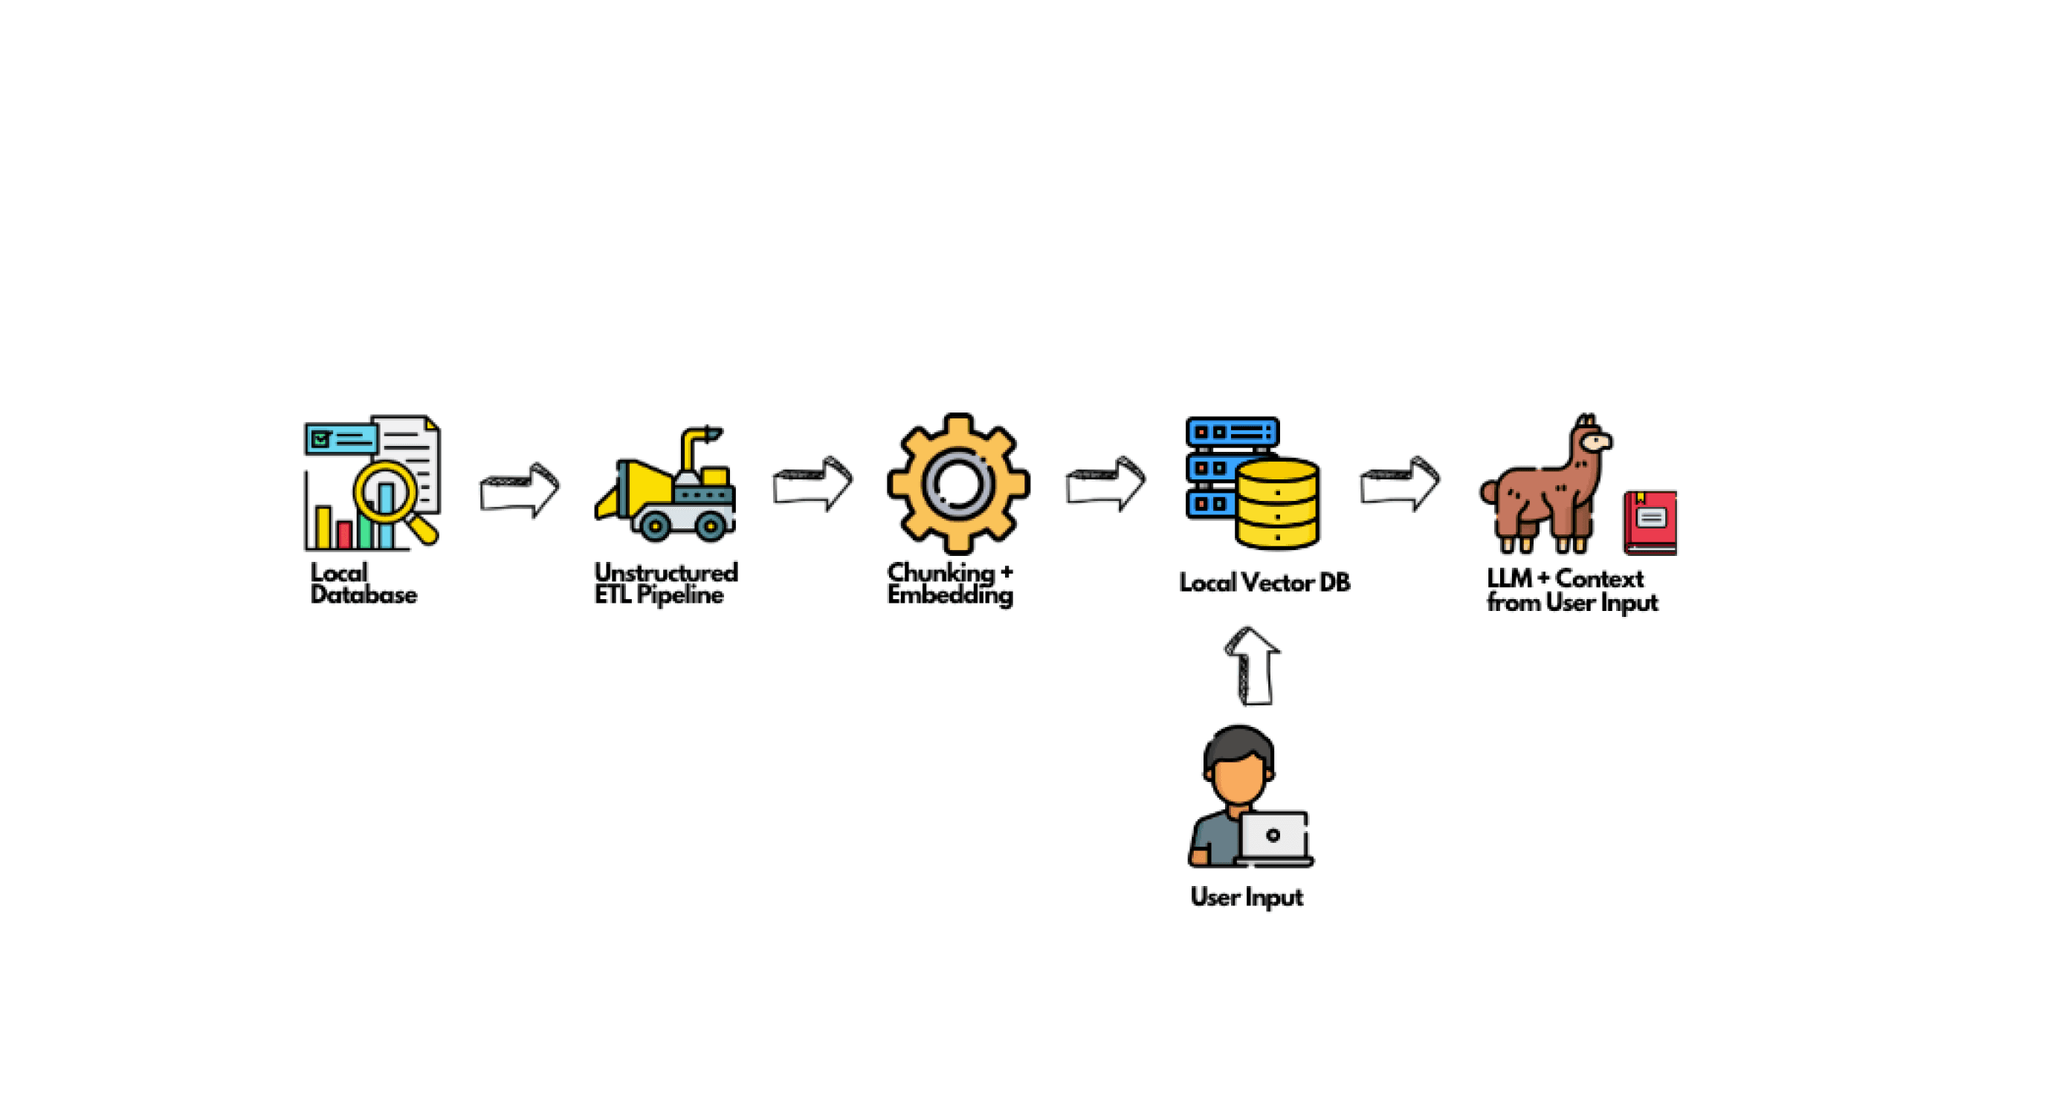
However, the power of RAG is truly unlocked when it has a reliable and efficient source of data. This is where Unstructured shines. Imagine having a treasure trove of data spread out in various formats and places, and the task of harnessing it feels herculean. Unstructured is purpose-built to bridge this gap. It acts as the ETL pipeline specifically designed for LLMs, connecting to your data regardless of its format or location, transforming and cleansing it into a streamlined and usable format. In essence, Unstructured is empowering your AI models with real-time, actionable data. It’s the first, yet the most crucial step in your AI journey, transforming unstructured data chaos into data-driven insights.
While many organizations are inclined to cloud-based RAG solutions, there’s a growing sentiment towards local implementations. This shift is driven by concerns over data privacy, desires for reduced latency, and considerations of cost. Opting for a local RAG system means ensuring that your data never leaves your premises, a crucial aspect for entities dealing with sensitive or proprietary information.
In this article, we’ll explore the specifics of constructing a private RAG system using a local model and vector database. We’ll break down the process and offer a step-by-step guide for those interested in such a setup. We will also spotlight why using Unstructured in your setup is not just a choice but a necessity.
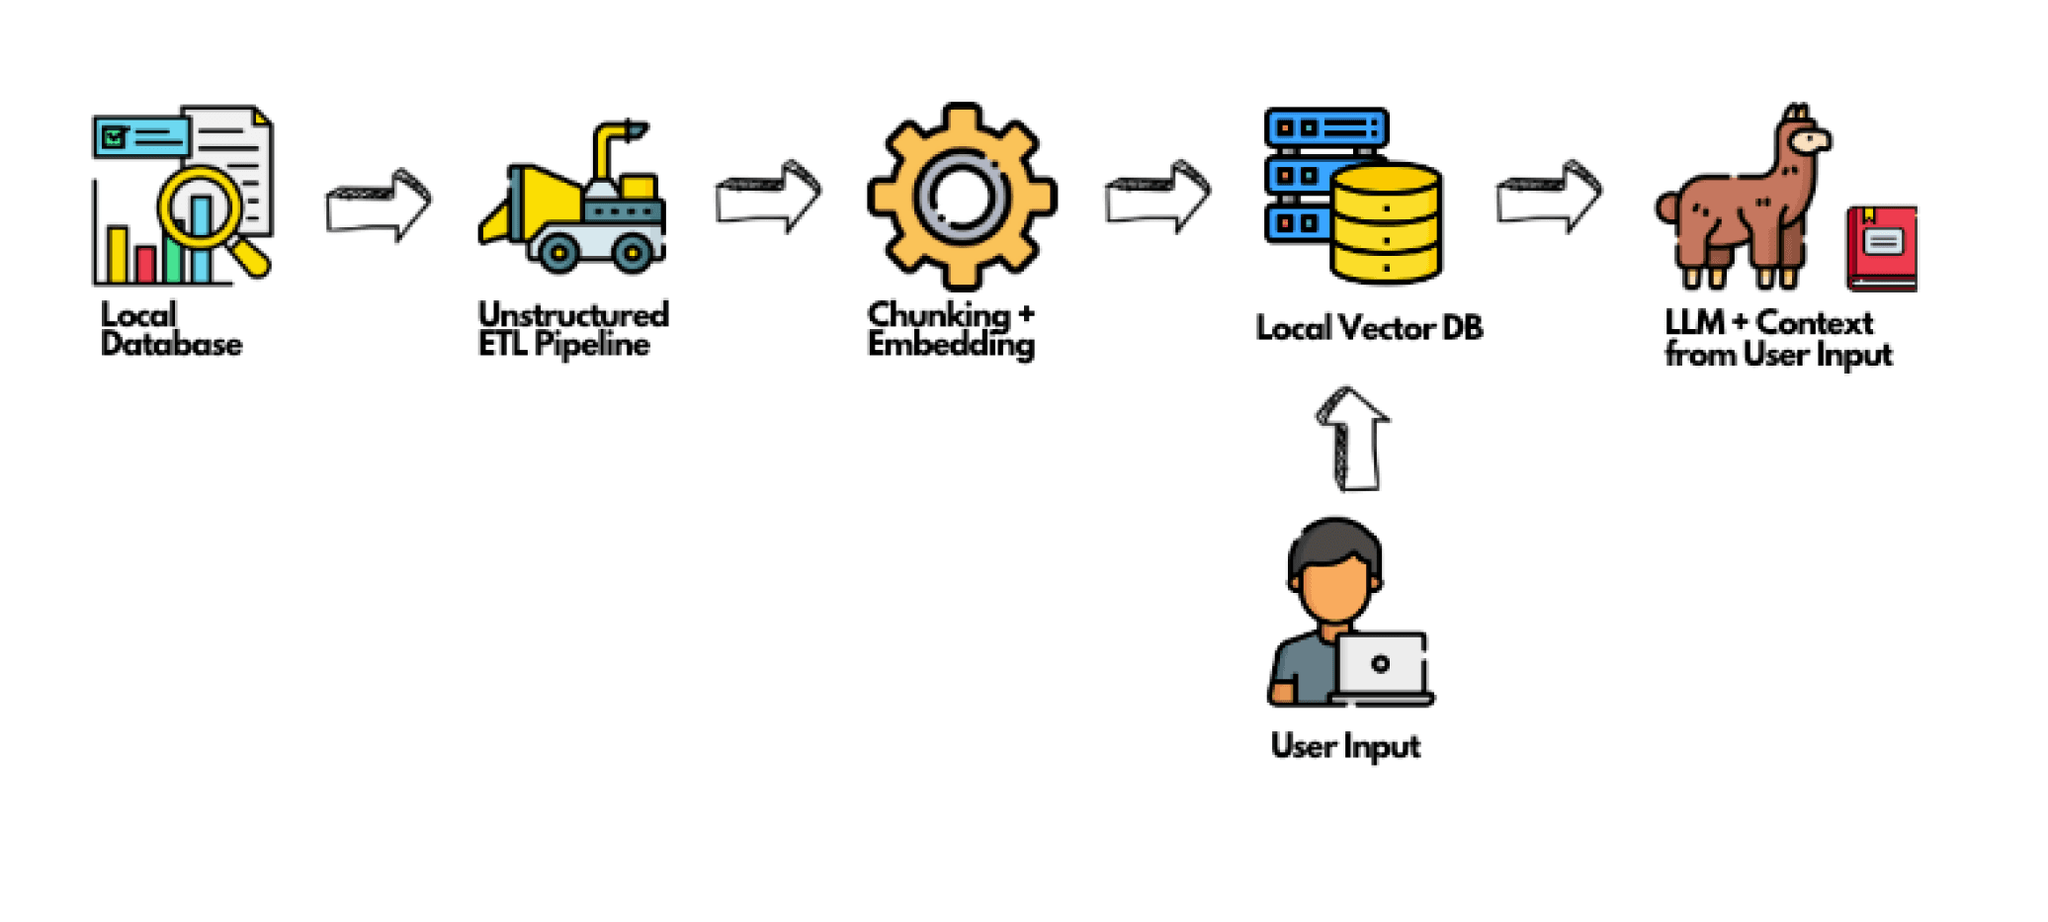
How to use Unstructured in your Local RAG System:
Unstructured is a critical tool when setting up your own RAG system. Here’s a step-by-step guide to get you started:
Prerequisites:
- Unstructured: Grab it from PyPI or directly clone its GitHub repository.
- Docker: Essential for containerized software utility.
- I will run the notebook in Jupyter Notebook. If you haven’t installed Jupyter Notebook yet you can follow these steps.
Setting up your Environment:
Now that you have installed the required packages, open up your terminal and run the following commands.
PYENV Installation: Use pyenv to manage your Python versions seamlessly.
pyenv install 3.9.1pyenv virtualenv 3.9.1 local-ragpyenv activate local-rag
Clone Repo:
git clone https://github.com/jackretterer/local-rag.git
Dependencies Installation: Install necessary packages from the provided requirements file.
cd local-ragpip install -r requirement.txt
Update Hugging Face Hub: To avoid any unforeseen issues, it’s a good practice to ensure that you’re running the latest version of huggingface_hub.
pip install --upgrade huggingface_hub
Docker Setup: Fire up Docker.
Creating the model directory: This directory will store the required model files.
mkdir model_files
Installing the llama-cpp-python package with specific build arguments:
CMAKE_ARGS="-DLLAMA_METAL=on" FORCE_CMAKE=1 pip install llama-cpp-python
Downloading a pre-trained model from Hugging Face Hub:
huggingface-cli download TheBloke/Llama-2-7b-Chat-GGUF --local-dir model_files --local-dir-use-symlinks False --include='*Q4_K*gguf'
I also made a new kernel for my jupyter notebook via:
- Ipykernel, you can install it via: $pip install ipykernel
- Run: $python -m ipykernel install — user — name=local-rag
- Restart notebook
- Kernel->Change Kernel->Local Rag
Set Parameters and Constants:
Before diving into the coding part, let’s first establish the foundation. Here, we define some key parameters and constants (this tutorial was designed to be run on Apple devices).
output_dir = 'my-docs' # Path to output directoryinput_dir = 'files_used' # Path to input directoryweaviate_url = "http://localhost:8080"embedding_model_name = 'all-MiniLM-L6-v2'device = 'mps'
Notice how we’ve set up directories for both input and output files. We also specify the weaviate_url, a crucial endpoint for our upcoming interactions.
Helper Functions to Ingest Documents and Pre-Process Them:
Next, we’re entering the realm of document ingestion and pre-processing. These helper functions will be our trusty tools to ensure a seamless data flow.
import subprocessimport osfrom typing import List, Dictfrom userpaths import get_my_documentsdef process_local(output_dir: str, num_processes: int, input_path: str): command = [ "unstructured-ingest", "local", "--input-path", input_path, "--output-dir", output_dir, "--num-processes", str(num_processes), "--recursive", "--verbose", ] # Run the command process = subprocess.Popen(command, stdout=subprocess.PIPE) output, error = process.communicate() # Print output if process.returncode == 0: print('Command executed successfully. Output:') print(output.decode()) else: print('Command failed. Error:') print(error.decode())def get_result_files(folder_path) -> List[Dict]: file_list = [] for root, dirs, files in os.walk(folder_path): for file in files: if file.endswith('.json'): file_path = os.path.join(root, file) file_list.append(file_path) return file_list
Once our data is processed, the get_result_files function comes into play. This utility function scours a directory to fetch a list of all JSON files, providing us with the much-needed collection of processed results.
Run Desired Pipeline To Generate Clean JSON using Unstructured
process_local(output_dir=output_dir, num_processes=2, input_path=input_dir)files = get_result_files(output_dir)
Helper Functions to Setup Weaviate Schema and Client
import uuidimport weaviatefrom weaviate.util import get_valid_uuiddef create_local_weaviate_client(db_url: str): return weaviate.Client( url=db_url, )def get_schema(vectorizer: str = "none"): return { "classes": [ { "class": "Doc", "description": "A generic document class", "vectorizer": vectorizer, "properties": [ { "name": "last_modified", "dataType": ["text"], "description": "Last modified date for the document", }, { "name": "player", "dataType": ["text"], "description": "Player related to the document", }, { "name": "position", "dataType": ["text"], "description": "Player Position related to the document", }, { "name": "text", "dataType": ["text"], "description": "Text content for the document", }, ], }, ], }def upload_schema(my_schema, weaviate): weaviate.schema.delete_all() weaviate.schema.create(my_schema)def count_documents(client: weaviate.Client) -> Dict: response = ( client.query .aggregate("Doc") .with_meta_count() .do() ) count = response return count
Setup Weaviate Client and Schema
Before diving into the intricate process of document indexing, the primary step is to set up our Weaviate client. This client will act as a bridge, connecting us to the Weaviate instance.
client = create_local_weaviate_client(db_url=weaviate_url)my_schema = get_schema()upload_schema(my_schema, weaviate=client)
With this groundwork, we have our Weaviate system primed and ready to accept the upcoming document chunks.
Helper Functions to Stage Unstructured Documents for Indexing
Handling unstructured data can be tricky. Hence, we’ll be leveraging a series of helper functions that leverage Unstructured’s library to process the unstructured data, chunk them appropriately, and index them in our system.
from unstructured.chunking.title import chunk_by_titlefrom unstructured.documents.elements import DataSourceMetadatafrom unstructured.partition.json import partition_jsonfrom sentence_transformers import SentenceTransformerembedding_model = SentenceTransformer(embedding_model_name, device=device)def compute_embedding(chunk_text: List[str]): embeddings = embedding_model.encode(chunk_text, device=device) return embeddingsdef get_chunks(elements, chunk_under_n_chars=500, chunk_new_after_n_chars=1500): for element in elements: if not type(element.metadata.data_source) is DataSourceMetadata: delattr(element.metadata, "data_source") if hasattr(element.metadata, "coordinates"): delattr(element.metadata, "coordinates") chunks = chunk_by_title( elements, combine_under_n_chars=chunk_under_n_chars, new_after_n_chars=chunk_new_after_n_chars ) for i in range(len(chunks)): chunks[i] = {"last_modified": chunks[i].metadata.last_modified, "text": chunks[i].text} chunk_texts = [x['text'] for x in chunks] embeddings = compute_embedding(chunk_texts) return chunks, embeddingsdef add_data_to_weaviate(files, client, chunk_under_n_chars=500, chunk_new_after_n_chars=1500): for filename in files: try: elements = partition_json(filename=filename) chunks, embeddings = get_chunks(elements, chunk_under_n_chars, chunk_new_after_n_chars) except IndexError as e: print(e) continue print(f"Uploading {len(chunks)} chunks for {str(filename)}.") for i, chunk in enumerate(chunks): client.batch.add_data_object( data_object=chunk, class_name="doc", uuid=get_valid_uuid(uuid.uuid4()), vector=embeddings[i] ) client.batch.flush()
Now, the spotlight is on add_data_to_weaviate. This function is the captain of our ship, orchestrating the entire process of reading, chunking, embedding, and eventually storing the data into Weaviate.
Add Chunks to Weaviate
Using the predefined functions, we’ll ingest our document chunks into the Weaviate system.
add_data_to_weaviate( files=files, client=client, chunk_under_n_chars=250, chunk_new_after_n_chars=500)print(count_documents(client=client)['data']['Aggregate']['Doc'])
Upon completion, a quick print statement gives us insight into the total number of documents we’ve successfully added.
LangChain RAG Application
For those unfamiliar, LangChain provides a suite of tools designed to enhance information retrieval, search, and more.
from langchain.llms import LlamaCppfrom langchain.vectorstores.weaviate import Weaviatefrom langchain.callbacks.manager import CallbackManagerfrom langchain.callbacks.streaming_stdout import StreamingStdOutCallbackHandlerfrom langchain.prompts import PromptTemplate
Instantiate Local Llama 2 LLM
The heart of our question-answering system lies in the open source Llama 2 LLM. At its core, it’s an intricate yet powerful model designed to generate human-like text based on the input provided.
callback_manager = CallbackManager([StreamingStdOutCallbackHandler()])n_gpu_layers = 1 # Metal set to 1 is enough.n_batch = 100 # Should be between 1 and n_ctx, consider the amount of RAM of your Apple Silicon Chip.# Make sure the model path is correct for your system!llm = LlamaCpp( model_path="model_files/llama-2-7b-chat.Q4_K_S.gguf", n_gpu_layers=n_gpu_layers, n_batch=n_batch, n_ctx=2048, # context window. By default 512 f16_kv=True, # MUST set to True, otherwise you will run into problem after a couple of calls callback_manager=callback_manager, verbose=True, # Verbose is required to pass to the callback manager)
Helper Function to Run RAG Process
Our main endeavor is to fetch relevant answers to any posed question. Hence, creating a function that encapsulates the entire RAG (Retrieval Augmented Generation) process is crucial.
def question_answer(question: str, vectorstore: Weaviate): embedding = compute_embedding(question) similar_docs = vectorstore.max_marginal_relevance_search_by_vector(embedding) content = [x.page_content for x in similar_docs] prompt_template = PromptTemplate.from_template( """\Given context about the subject, answer the question based on the context provided to the best of your ability.Context: {context}Question:{question}Answer:""" ) prompt = prompt_template.format(context=content, question=question) answer = llm(prompt) return answer, similar_docs
This function, question_answer, works in stages. Initially, it computes an embedding of the provided question using our earlier-defined method. With this embedding, the system scours the vector store to find documents most related to our query. These documents serve as the context for our LLM, helping it craft a well-informed response.
Run RAG on a Question
Time to put our system to the test.
client = weaviate.Client(weaviate_url)vectorstore = Weaviate(client, "Doc", "text")question = "Give a summary of NFL Draft 2020 Scouting Reports: RB Jonathan Taylor, Wisconsin?"answer, similar_docs = question_answer(question, vectorstore)print("\n\n\n-------------------------")print(f"QUERY: {question}")print("\n\n\n-------------------------")print(f"Answer: {answer}")print("\n\n\n-------------------------")for index, result in enumerate(similar_docs): print(f"\n\n-- RESULT {index+1}:\n") print(result)
Results:
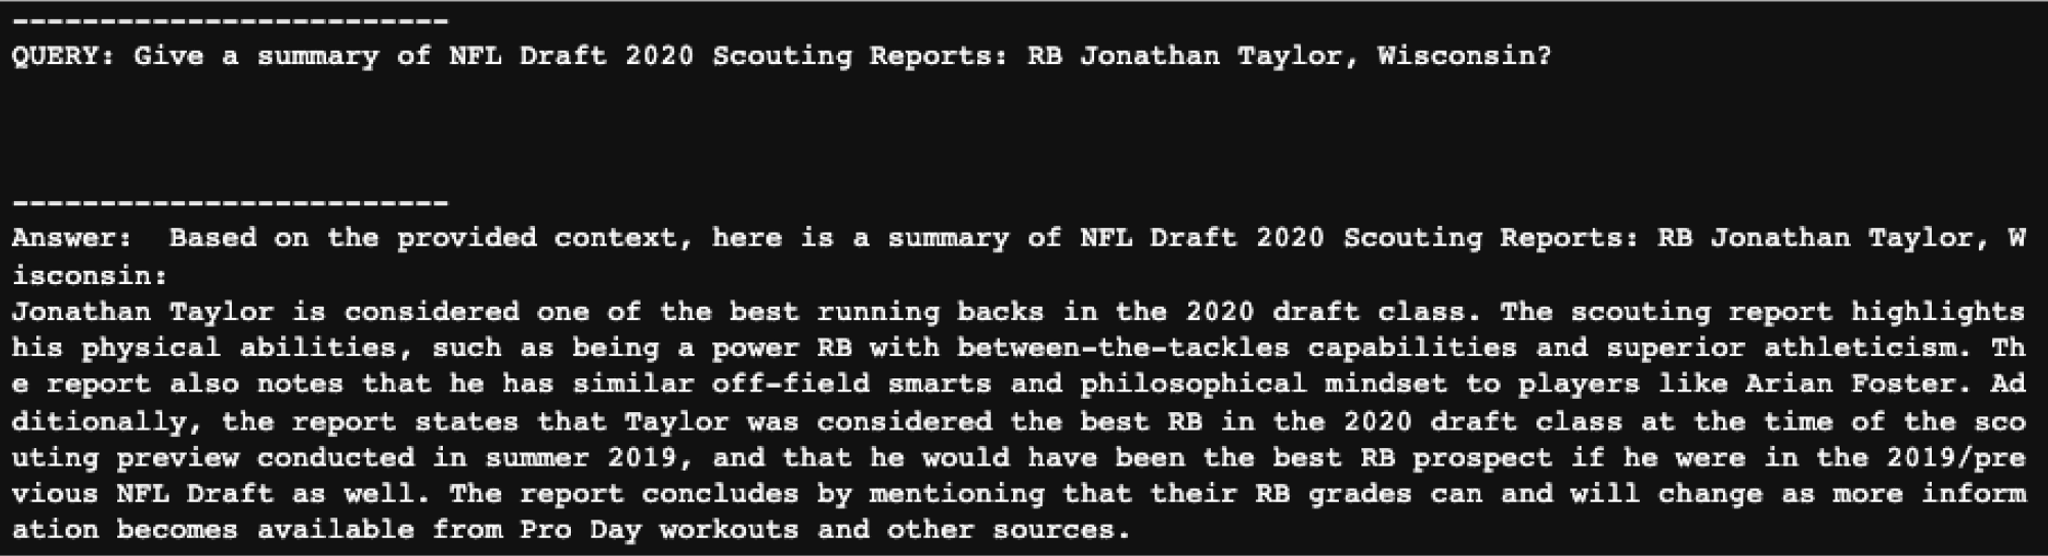
This result does show an accurate retrieval.
Conclusion:
In an era dominated by digital innovation, building robust RAG systems is no longer a herculean task. With the step-by-step guide laid out in this blog, we’ve offered an approach that is both effective and accessible. While the presented workflow can undergo further refinements to meet the demands of a production-grade environment, our primary focus was to maintain its simplicity for clarity’s sake. Moreover, the emphasis on local setups underscores the significance of data privacy. By opting for in-house RAG implementations, organizations can strike a balance between harnessing the power of cutting-edge AI technology and ensuring that sensitive information remains safeguarded. As part of our ongoing commitment to enhancing data privacy, we’re thrilled to announce that support for RBAC (Role-Based Access Control) is on our roadmap and will be rolling out in the coming weeks. As AI continues to permeate various sectors, prioritizing data security becomes paramount. Through local RAG systems, we are not just stepping into the future of AI; we are doing so responsibly and ethically.
Encountered challenges following this tutorial or have questions? I encourage you to join our community Slack group. There, you can connect with fellow users, exchange insights, and stay updated on the latest developments. We’re excited to see the innovations you come up with!
A link to the full code can be found in this Github repo.