Authors

The advancements in LLMs have brought about a technological disruption. OpenAI’s GPT-3, 3.5, and 4 have democratized access to high-power language models, enabling a wide array of users to interact with them. Still, while LLMs are brimming with knowledge, they are bound by the confines of time — their knowledge, as vast as it is, remains general and frozen at a specific point in time.
Take GPT’s cut-off in September 2021, for instance. In a fast-paced world, where new research, cultural phenomena, and global events emerge almost daily, how does one ensure the relevance of an LLM post-2021?
While GPT’s knowledge is broad, ensuring it possesses knowledge specific to your organization or area of expertise is a critical challenge to address. Imagine trying to discuss the intricacies of a specific domain — while GPT provides a general overview, it may lack the detailed knowledge and updated insights necessary to be useful.
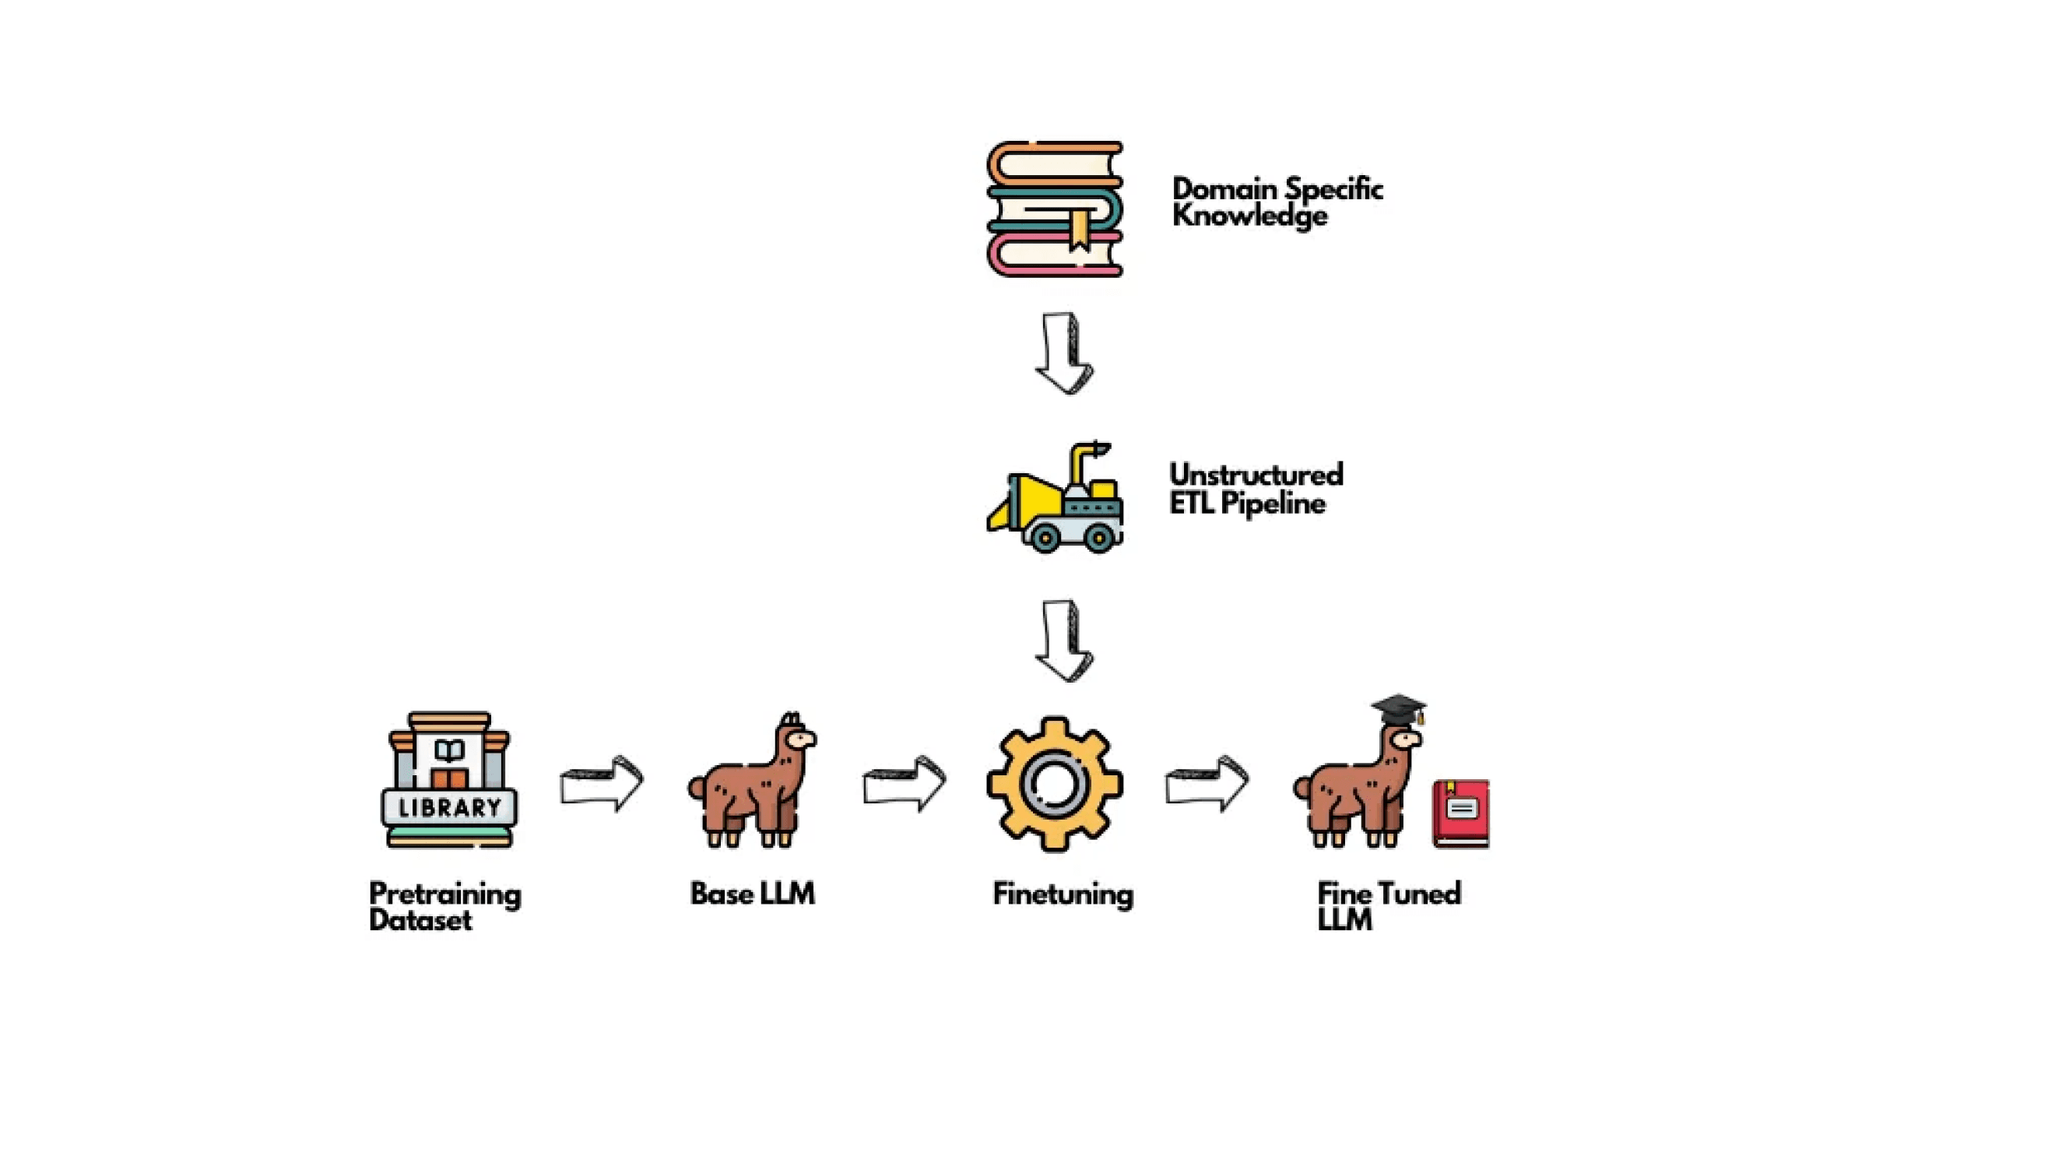
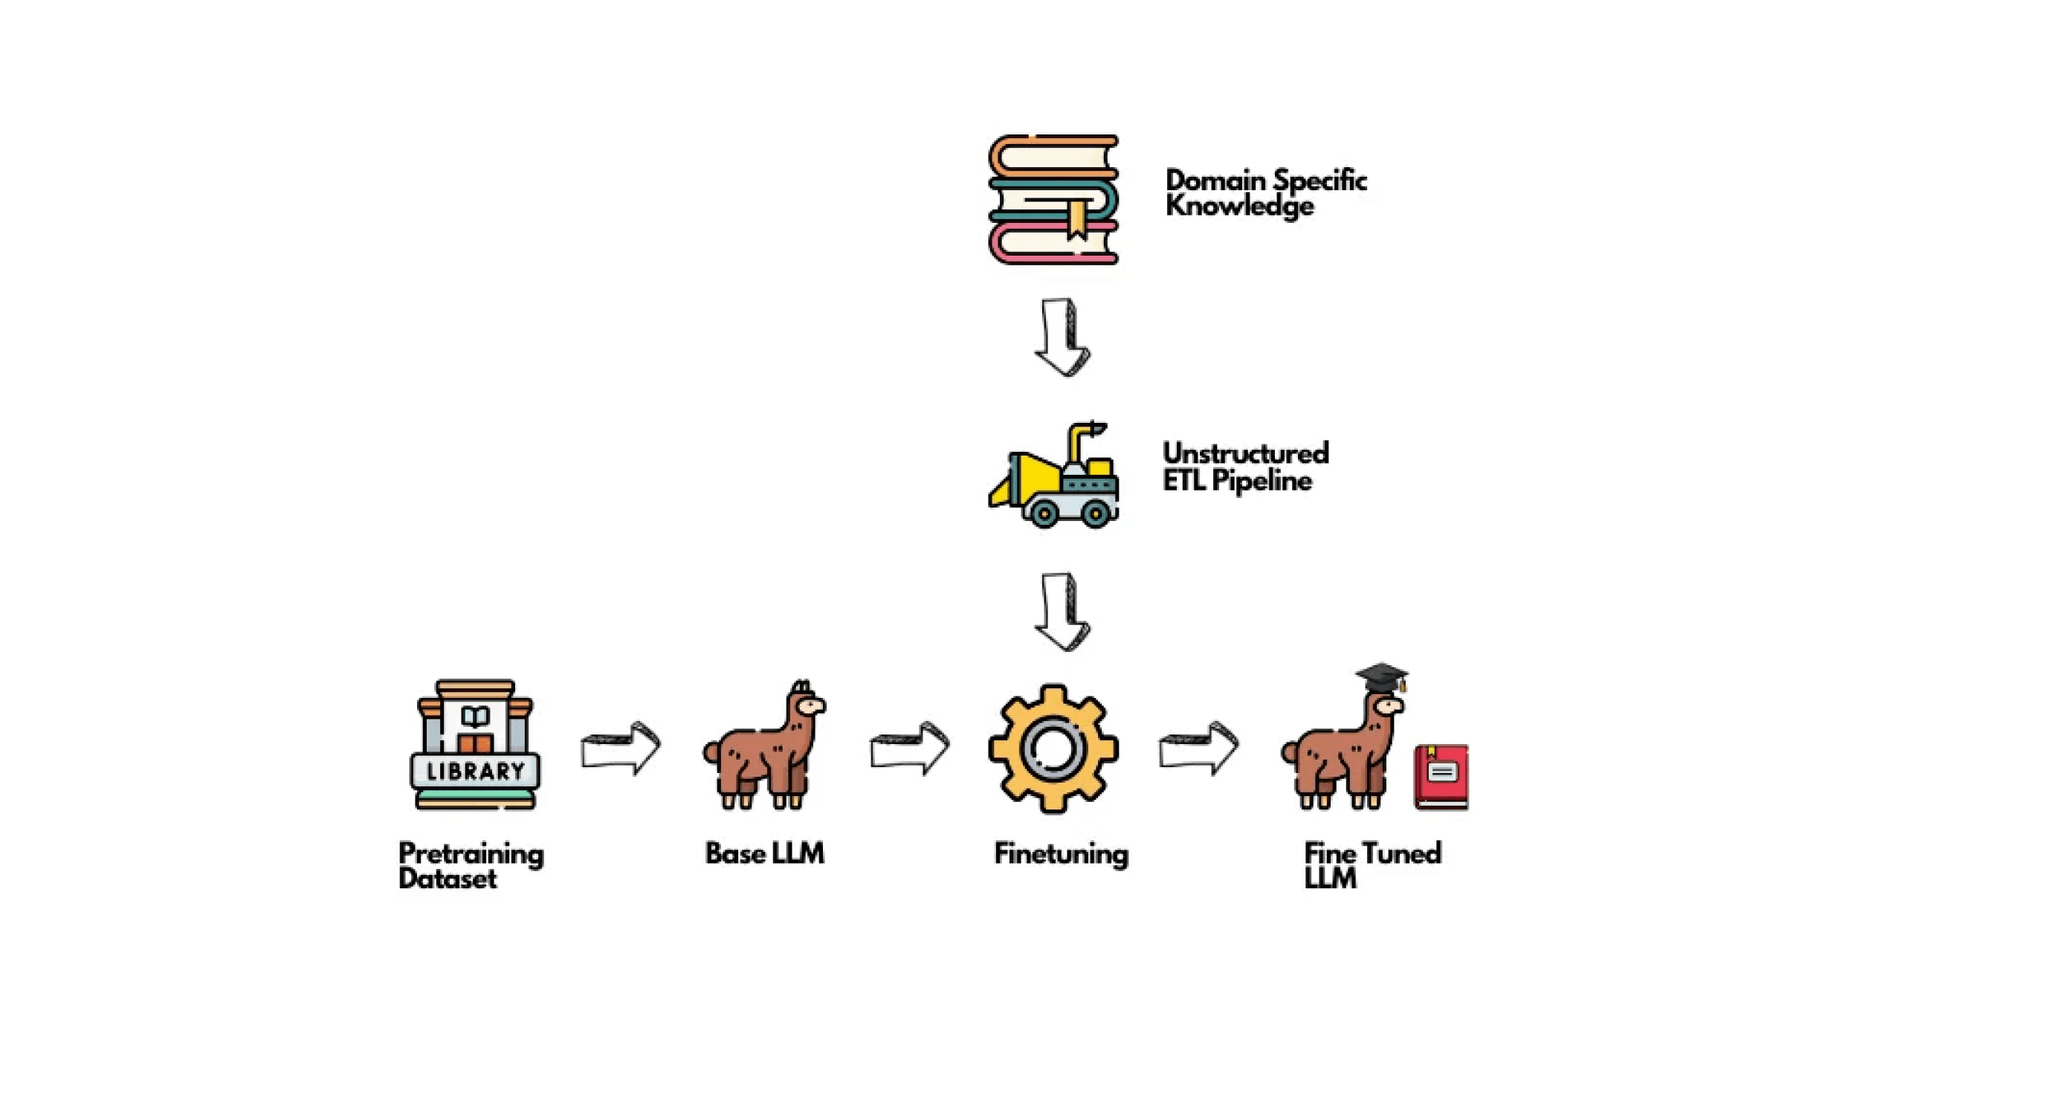
These inherent limitations require organizations to utilize techniques such as fine-tuning and Retrieval Augmented Generation (RAG). While RAG provides a mechanism for models to access novel information, fine-tuning ensures that specialized and domain-specific knowledge is directly encoded into the memory of the model itself.
In this way, pre-training could be compared to a general purpose high school degree, fine tuning to a highly specialized vocational program, and RAG as a mechanism to allow access to new information after graduating with a high school degree or vocational program.
This is where Unstructured steps in as a game-changer. If you’re aiming to power GPT with the most up-to-date data or niche-specific insights, look no further. Want to learn how? Dive into this guide and try it for yourself.
How to use Unstructured to add New Data to ChatGPT:
Prerequisites:
- Install Unstructured from PyPI or GitHub repo
- Install Unstructured Google Cloud connectors here
- Obtain Unstructured API Key here
- Obtain OpenAI API Key here
- A Google Drive folder full of documents you want to process
- Basic knowledge of Python & Jupyter Notebook
Acquire Our Dataset
To kick off our fine-tuning adventure, we’ll want a specialized dataset. For demonstration, we’ll be training GPT-3.5 on the Federal Open Market Committee’s (FOMC) meeting notes, focusing on topics like inflation and the federal funds rate.
I’ve gone ahead and downloaded the meeting notes from the federal reserves website (link) and uploaded them to a google drive folder.
Enable Google Drive Access:
Before GPT-3.5 can learn from these notes, we need to ingest and preprocess. If you’re new to Google Drive integrations, follow along. If you’re a seasoned pro, you can leapfrog to the subsequent section.
- Navigate to your Google Cloud Console (link)
- Click on the project that you plan on grabbing data from
- On the left side of the screen click IAM & Admin -> Service Accounts
- Click “+ Create Service Account” and fill in the fields
- Once you’ve created the new service account click on it and go to “KEYS”
- Click “ADD KEY”->”Create new key”->JSON
- That will download a JSON file with your keys. Please ensure that these keys are properly stored as they pose a security risk.
- Place the JSON file somewhere safe and in a path you can access later on
Run Unstructured API with Google Drive Connector:
The journey to tapping into the wealth of information within your documents starts with setting up the Unstructured API. Think of this as bridging the world of your stored knowledge (on Google Drive) with the potential of GPT’s fine-tuning capabilities.
To harness this, you’ll first need the Unstructured open-source library, available on GitHub. Navigate to the repository, follow the setup instructions, and arm yourself with the essential tools.
To streamline this process, ensure you’ve installed the necessary dependencies. Let’s fetch them:
!pip install "unstructured[gdrive,all-docs]" openai
Once you installed the additional dependencies, you are good to run the API. For this tutorial, I’ve elected to run the API in a python notebook.
# Set up the environment with Google Drive service account credentialsos.environ['GOOGLE_APPLICATION_CREDENTIALS'] = '/Path/To/Your/Google/Credentials/keyfile.json'# https://drive.google.com/drive/folders/{folder-id}command = [ "unstructured-ingest", "gdrive", "--drive-id", "folder-id", "--service-account-key", "Path/To/Your/Google/Credentials/keyfile.json", "--structured-output-dir", "/Path/To/Your/Output/Folder", "--num-processes", "2", "--recursive", "--verbose", "--partition-pdf-infer-table-structure", "true", # Only necessary if tables are present in the PDFs "--partition-strategy", "hi_res", # Only necessary if images/tables are in the PDFs "--api-key", "<YOUR-API-KEY>", "--partition-by-api"]# Let's break this down:# 1. Set Google Drive's service account credentials# 2. Specify 'gdrive' as our data connector # 3. Set the output directory with `--structured-output-dir`# 4. Optimize processing speed using `--num-processes`# 5. Insert your `--api-key` obtained earlier# 6. The `--partition-by-api` flag allows the API (not just the library) to handle data partitioning# Now, let's execute and collect our dataprocess = subprocess.Popen(command, stdout=subprocess.PIPE)output, error = process.communicate()# Print outputif process.returncode == 0: print('Command executed successfully. Output:') print(output.decode())else: print('Command failed. Error:') print(error.decode())
Form Our Fine-Tuning Dataset:
Now that we have all the preprocessed files into JSON we can now extract all the text and put it into a dictionary for each of the files:
# FUNCTION USED FOR GRABBING ALL THE TEXT ELEMENTS FROM THE JSON FILESdef extract_text_from_json(directory): # Ensure the provided path exists and is a directory if not os.path.exists(directory) or not os.path.isdir(directory): print(f"'{directory}' is not a valid directory path.") return extracted_texts = {} # Iterate over each file in the directory for filename in os.listdir(directory): # Check if the file is a JSON file if filename.endswith('.json'): filepath = os.path.join(directory, filename) with open(filepath, 'r') as json_file: try: data = json.load(json_file) # Initialize a list to collect texts from the current file texts_list = [] # If data is a list, iterate through its items if isinstance(data, list): for item in data: if "text" in item: texts_list.append(item["text"]) # If data is a dictionary, just get the "text" key elif isinstance(data, dict): texts_list.append(data.get("text", "")) # Join the texts and store in the dictionary extracted_texts[filename] = "\n".join(texts_list) except json.JSONDecodeError: print(f"'{filename}' is not a valid JSON file.") return extracted_text
Now we can run the helper function:
texts_dict = extract_text_from_json('Path/To/Output/Folder')
Generate Fine-Tuning Data
With our cleaned and extracted text from the PDFs we can create a fine-tuning dataset. I leveraged GPT4 to take the text from each dictionary and to create a series of questions and answers to fine-tune the model.
My prompt was:
Given the following section, craft 15 insightful questions and their corresponding answers. Ensure the questions and answers encapsulate key details for an effective fine-tuning dataset:The format of the question should be: {"messages": [{"role": "system", "content": "Marv is a factual chatbot well-versed in recent Federal Reserve data."}, {"role": "user", "content": "What did the Federal Reserve announce on July 26, 2023 regarding the federal funds rate?"}, {"role": "assistant", "content": "On July 26, 2023, the Federal Reserve announced that they decided to raise the target range for the federal funds rate to 5-1/4 to 5-1/2 percent."}]}Section: [ENTER-YOUR-SECTION-COPIED-FROM-THE-DICTIONARY]
Assemble The Fine-Tuned Dataset
OpenAI states that the minimum dataset required to fine tune a model is 10 examples. However OpenAI generally recommends at least 50 to 100 training examples with “gpt-3.5-turbo”.
I repeated the above code for each file (5 files in my case, so 75 examples) and put the results into a finetuning_gpt.jsonl file.
I also encountered a fair amount of errors while formatting the .jsonl format and created a helper function to find and identify the errors:
dataset = []data_path = "/PATH/TO/finetuning_gpt.jsonl"# Helper to diagnose JSON decoding errorswith open(data_path, 'r', encoding='utf-8') as f: for idx, line in enumerate(f): try: dataset.append(json.loads(line)) except json.JSONDecodeError: print(f"Error decoding JSON on line {idx + 1}:") print(line) print("-" * 40)
For those keen on diving deeper into the fine-tuning intricacies, there’s this invaluable Python notebook I discovered: link
Here are some helpers to ensure your dataset structure is pristine:
# Load the datasetwith open(data_path, 'r', encoding='utf-8') as f: dataset = [json.loads(line) for line in f]# Initial dataset statsprint("Num examples:", len(dataset))print("First example:")for message in dataset[0]["messages"]: print(message)# Format error checksformat_errors = defaultdict(int)for ex in dataset: if not isinstance(ex, dict): format_errors["data_type"] += 1 continue messages = ex.get("messages", None) if not messages: format_errors["missing_messages_list"] += 1 continue for message in messages: if "role" not in message or "content" not in message: format_errors["message_missing_key"] += 1 if any(k not in ("role", "content", "name") for k in message): format_errors["message_unrecognized_key"] += 1 if message.get("role", None) not in ("system", "user", "assistant"): format_errors["unrecognized_role"] += 1 content = message.get("content", None) if not content or not isinstance(content, str): format_errors["missing_content"] += 1 if not any(message.get("role", None) == "assistant" for message in messages): format_errors["example_missing_assistant_message"] += 1if format_errors: print("Found errors:") for k, v in format_errors.items(): print(f"{k}: {v}")else: print("No errors found")
Token Limits
Keep in mind, OpenAI has established limits: each training example can have a maximum of 4096 tokens. Any examples stretching beyond this will be trimmed to fit within this limit. Therefore, it’s a good strategy to keep individual examples well below this — aim for under 4,000 tokens for some breathing space. Also, keep an eye on the total tokens across your dataset, considering a max cap of 50 million tokens for the entirety of your training job (calculated as tokens_in_dataset * n_epochs).
To steer clear of these boundaries, use this helper to ensure each example stays within bounds:
encoding = tiktoken.get_encoding("cl100k_base")# not exact!# simplified from https://github.com/openai/openai-cookbook/blob/main/examples/How_to_count_tokens_with_tiktoken.ipynbdef num_tokens_from_messages(messages, tokens_per_message=3, tokens_per_name=1):num_tokens = 0for message in messages:num_tokens += tokens_per_messagefor key, value in message.items():num_tokens += len(encoding.encode(value))if key == "name":num_tokens += tokens_per_namenum_tokens += 3return num_tokensdef num_assistant_tokens_from_messages(messages):num_tokens = 0for message in messages:if message["role"] == "assistant":num_tokens += len(encoding.encode(message["content"]))return num_tokensdef print_distribution(values, name):print(f"\n#### Distribution of {name}:")print(f"min / max: {min(values)}, {max(values)}")print(f"mean / median: {np.mean(values)}, {np.median(values)}")print(f"p5 / p95: {np.quantile(values, 0.1)}, {np.quantile(values, 0.9)}")# Warnings and tokens countsn_missing_system = 0n_missing_user = 0n_messages = []convo_lens = []assistant_message_lens = []for ex in dataset:messages = ex["messages"]if not any(message["role"] == "system" for message in messages):n_missing_system += 1if not any(message["role"] == "user" for message in messages):n_missing_user += 1n_messages.append(len(messages))convo_lens.append(num_tokens_from_messages(messages))assistant_message_lens.append(num_assistant_tokens_from_messages(messages))print("Num examples missing system message:", n_missing_system)print("Num examples missing user message:", n_missing_user)print_distribution(n_messages, "num_messages_per_example")print_distribution(convo_lens, "num_total_tokens_per_example")print_distribution(assistant_message_lens, "num_assistant_tokens_per_example")n_too_long = sum(l > 4096 for l in convo_lens)print(f"\n{n_too_long} examples may be over the 4096 token limit, they will be truncated during fine-tuning")
Estimate Costs
OpenAI does impose charges when you fine-tune their models. For a detailed pricing breakdown, visit this link. To give you a ballpark figure of the potential costs, you can use OpenAI’s formula:
base cost per 1k tokens * number of tokens in the input file * number of epochs trained
To illustrate, if you have a training file consisting of 100,000 tokens and you train it over 3 epochs, you would incur an estimated cost of about $2.40 USD.
Here’s a Python code to help you estimate the cost:
# Pricing and default n_epochs estimateMAX_TOKENS_PER_EXAMPLE = 4096TARGET_EPOCHS = 3MIN_TARGET_EXAMPLES = 100MAX_TARGET_EXAMPLES = 25000MIN_DEFAULT_EPOCHS = 1MAX_DEFAULT_EPOCHS = 25n_epochs = TARGET_EPOCHSn_train_examples = len(dataset)if n_train_examples * TARGET_EPOCHS < MIN_TARGET_EXAMPLES:n_epochs = min(MAX_DEFAULT_EPOCHS, MIN_TARGET_EXAMPLES // n_train_examples)elif n_train_examples * TARGET_EPOCHS > MAX_TARGET_EXAMPLES:n_epochs = max(MIN_DEFAULT_EPOCHS, MAX_TARGET_EXAMPLES // n_train_examples)n_billing_tokens_in_dataset = sum(min(MAX_TOKENS_PER_EXAMPLE, length) for length in convo_lens)print(f"Dataset has ~{n_billing_tokens_in_dataset} tokens that will be charged for during training")print(f"By default, you'll train for {n_epochs} epochs on this dataset")print(f"By default, you'll be charged for ~{n_epochs * n_billing_tokens_in_dataset} tokens")
Once you’ve assembled your fine-tuning dataset, it’s time to upload it to OpenAI. Here’s how:
os.environ['OPENAI_API_KEY'] = "YOUR-OPENAI-API-KEY"openai.api_key = os.getenv("OPENAI_API_KEY")file_id = openai.File.create( file=open("/PATH/TO/finetuning_gpt.jsonl", "rb"), purpose='fine-tune')
Creating the Fine-Tuned Model:
After uploading your dataset, the next step is to initiate a fine-tuning job. However, it’s essential to have a grasp on what to expect in terms of training duration.
Anticipating Training Duration
With OpenAI, the training duration can be somewhat unpredictable. Your job might get queued behind other tasks, meaning you could wait anywhere from mere minutes to several hours. Rest assured, once the training concludes, you’ll receive an email notification.
For perspective, my dataset — which was relatively compact — took about 35 minutes to be processed. I launched the training at 4:30 pm PST, and by 5:05 pm PST, it was complete.
# Initiate a fine-tuned modeljob = openai.FineTuningJob.create(training_file=file_id.id, model="gpt-3.5-turbo")job_id = job.id
Side Note: While I was executing the process, I bumped into an error message that read, “AttributeError: module ‘openai’ has no attribute ‘FineTuneingJob’”. If you stumble upon this, a simple kernel restart of your notebook and an OpenAI library update did the trick for me.
Post-training, you’ll need to fetch the model name. This name is crucial when making calls to the OpenAI API:
model_name_pre_object = openai.FineTuningJob.retrieve(job_id)model_name = model_name_pre_object.fine_tuned_modelprint(model_name)
Once your job concludes, you can utilize the model for inference immediately. If, however, you notice timeouts or can’t locate the model name, it might be because the model is still in the loading phase. Give it a few minutes and try again.
completion = openai.ChatCompletion.create( model=model_name, messages=[ {"role": "user", "content": "When did the FED decide to raise federal funds to 5%?"} ])print(completion.choices[0].message['content'])
Results:
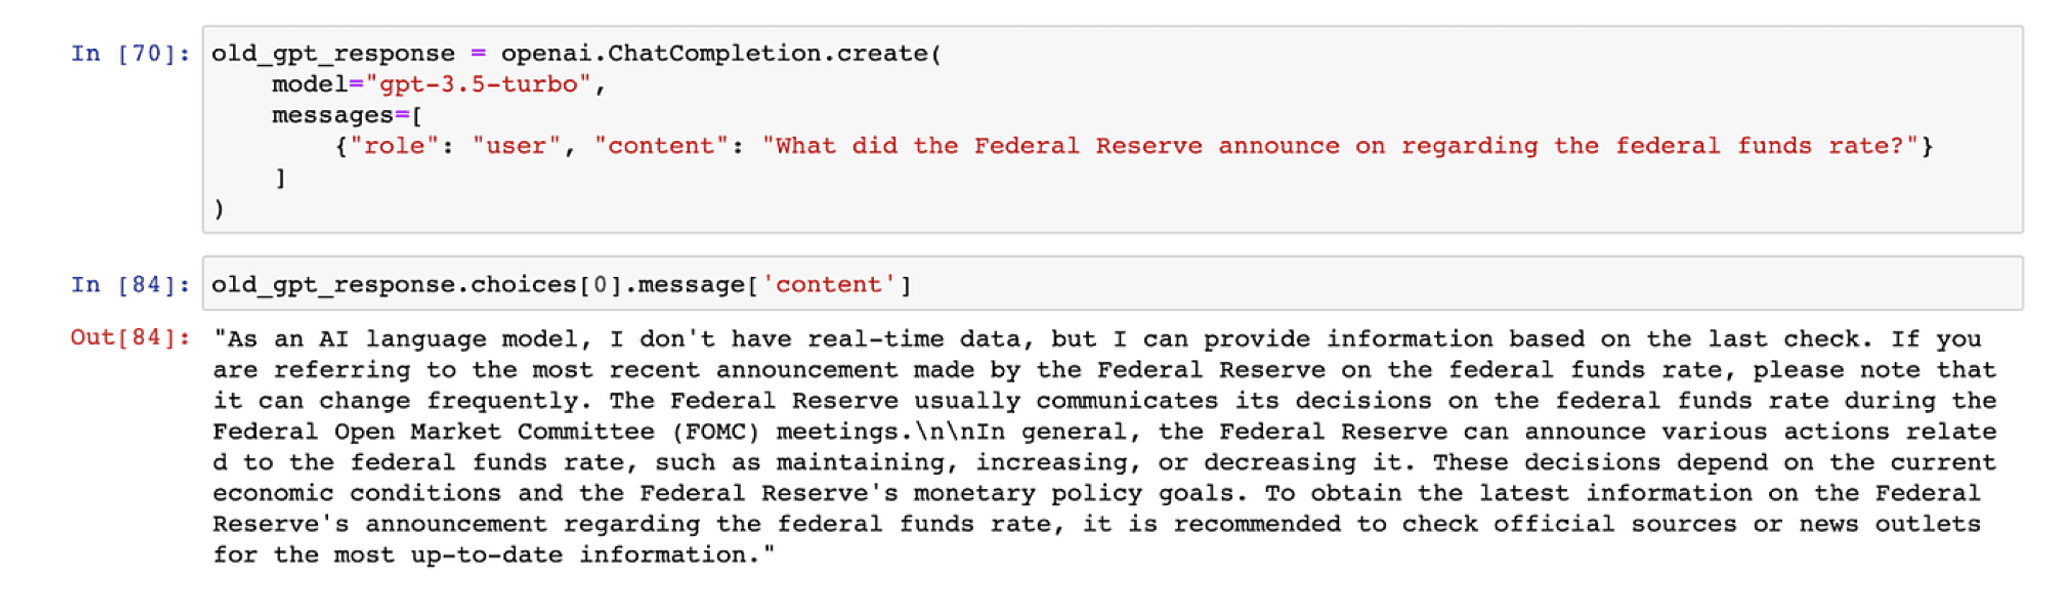
The outcomes from fine-tuning have been fairly positive. With the updated knowledge up to September 2023, the model can address a range of basic queries, although it has its limitations.
To demonstrate its capabilities, here are two instances where the fine-tuned model provided accurate responses:


However, it’s not always flawless. There are moments when the model’s responses are off the mark, or it presents skewed information — sometimes referred to as “hallucinations.”

Despite these occasional hiccups, a comparative analysis shows that the fine-tuned model outperforms the default GPT-3.5-turbo model in terms of accuracy and relevance.
Conclusion:
Fine-tuning is an effective solution to the “frozen-in-time” aspect of LLMs and hones models’ expertise on specific domains. That said, we would recommend utilizing a fine tuned model in conjunction with a RAG (Retriever-Augmented Generation) architecture for the best results.
Now, while the concepts of fine-tuning and RAG might seem daunting to many, Unstructured is simplifying the process. Our platform integrates your favorite or up-to-date data sources, making fine-tuning not just effective, but also effortless and intuitive.
I’m currently in the midst of crafting a comprehensive blog post that will juxtapose the two techniques of fine-tuning and RAG. This piece will delve into their unique strengths and limitations. So, keep an eye out for this insightful exploration in the upcoming weeks!
Encountered challenges following this tutorial or have questions? I encourage you to join our community Slack group. There, you can connect with fellow users, exchange insights, and stay updated on the latest developments. We’re excited to see the innovations you come up with!
A link to the full code can be found in this Google Colab notebook.