Everything (from) Everywhere All At Once - Enterprise RAG with Multiple Sources and Filetypes
Oct 2, 2025
Authors

Enterprise knowledge doesn't live in one place, it lives everywhere. And that's not a storage problem; it's a retrieval problem.
Your sales decks live in OneDrive. Customer contracts sit in Azure Blob Storage. Critical context is buried in Outlook threads. Each system holds a piece of the puzzle, and each piece comes in a different format: PDFs, PowerPoints, Excel files, emails. The information exists. Finding it when you need it? That's where things break down.
Most Retrieval Augmented Generation systems assume clean data from a single source. They're built for scenarios where everything's already organized, formatted consistently, and living in one nice, queryable database. But in reality? Not that fortunate.
The challenge isn't just connecting to multiple sources, it's making sense of what you find there. Can your system understand the chart on slide 47 of that sales deck? Can it parse customer commitments from emails? Can it pull the right financial figure from a complex Excel model without losing context?
At Unstructured, we've learned that building enterprise AI systems isn't about choosing between sources or file types. It's about building a system that can handle all of them intelligently.
So let’s roll up our sleeves. In this tutorial, we’ll move from problem to practice and walk step by step through building a pipeline that can connect to your sources, process messy file types, and make them queryable with RAG.
What You’ll Build
Here's the scenario: you want an AI assistant that genuinely knows your company's scattered knowledge, one that's already ingested everything from Azure storage, OneDrive folders, and Outlook emails. The assistant queries preprocessed, structured data that understands what was in those files—text, tables, images, all of it.
To show how this works, we'll build a complete pipeline that:
Connects to multiple enterprise sources:
- Azure Blob Storage (where large files and archives live)
- OneDrive (where team collaboration happens)
- Outlook (where context and conversations hide)
Handles real-world file types:
- PDFs (contracts, reports, documentation)
- PowerPoint (presentations with charts, diagrams, visual data)
- Excel/CSV (structured data, financial models)
- Emails (conversational context, commitments)
Processes the chaos intelligently:
- Uses Unstructured to parse complex layouts, extract text from images, understand tables
- Enriches content so your AI assistant doesn't just see text, it understands structure, context, and relationships
Makes it retrievable:
- Pushes everything into AstraDB
- Builds a RAG pipeline that can answer questions across your entire data ecosystem
The heavy lifting—connecting to sources, processing files, handling complex layouts—all happens through Unstructured's platform UI. The RAG implementation lives in a notebook (we'll walk through both), but the hard part of making sense of your scattered data is all through visual configuration.
By the end of this walkthrough, you'll have a working assistant that can answer "What did we promise that healthcare client?" by pulling from a PowerPoint in OneDrive, cross-referencing an email thread in Outlook, and citing the actual contract from Azure storage.
Prerequisites
If you don't already have an Unstructured account, sign up for free here. Once you're in, you should be able to complete the next steps.
Connecting to Enterprise Data Sources
Azure Blob Storage:
First up: connecting to Azure Blob Storage, where your PDFs, contracts, and archived documents likely live.
Here's what you need:
- An Azure Storage account with a container
- The container's remote URL (format:
az://<container-name>/<path/to/folder>) - An SAS token for authentication (recommended for scoped access)
If you need help generating an SAS token with the right permissions (Read, Write, and List), this video walks you through it. For more details on setting up your Azure account and storage, check the Azure Blob Storage docs.
Once you've got your credentials ready:
- Head to the Connectors tab in Unstructured
- Click Sources → New Connector
- Select Azure Blob Storage as your provider
- Fill in:
- Name: Something descriptive (e.g., "Azure Legal Docs")
- Remote URL: Your container path (e.g.,
az://my-container/legal-docs/) - Account Name: Your Azure storage account name
- SAS Token: Paste the token you generated
- Check Recursive if you want to pull from subfolders
- Hit Save and Test
OneDrive:
Next: OneDrive, where your team's presentations, shared documents, and collaborative work live.
Here's what you need:
- A OneDrive for Business account (part of Microsoft 365 or Office 365 Business/Enterprise plans)
- A Microsoft Entra ID app registration with the right permissions
- The path to your target folder (e.g.,
sales-decks/q4-presentations) - Your User Principal Name (UPN)—typically your work email address
The setup requires creating an Entra ID app registration with specific Microsoft Graph permissions (Files.ReadWrite.All, Sites.ReadWrite.All, User.Read.All, Directory.Read.All). If you need help with this, these videos walk you through creating the app registration and adding the correct permissions.
Once you have your app registration ready:
- In Unstructured, go to Connectors → Sources → New Connector
- Select OneDrive as your provider
- Fill in:
- Name: Something descriptive (e.g., "OneDrive Sales Decks")
- Client ID: Your app registration's Application (client) ID
- Tenant ID: Your Directory (tenant) ID
- Authority URL: Use the default (
https://login.microsoftonline.com) - Principal Name: Your UPN (work email)
- Client Credential: The client secret from your app registration
- Path: Your target folder path (e.g.,
sales-decks/q4-presentations)
- Check Recursive if you want subfolders included
- Click Save and Test
Outlook:
Last source: Outlook, where critical context lives in emails.
Here's what you need:
- The Outlook user's email address you want to ingest from
- A Microsoft Entra ID app registration (same setup as OneDrive, if you already created one)
- Specific Graph API permissions for the app registration:
Mail.ReadMail.ReadBasicUser.Read.All
- The folder names you want to access (e.g., Inbox, Sent Items, or specific project folders)
If you're reusing the same Entra ID app from OneDrive, just make sure it has these mail-specific permissions added. Here's how to add permissions.
To connect Outlook:
- In Unstructured, go to Connectors → Sources → New Connector
- Select Outlook as your provider
- Fill in:
- Name: Something clear (e.g., "Outlook Customer Threads")
- User Email: The target email address
- Authentication Provider URL: Keep the default (
https://login.microsoftonline.com) - Tenant: Your Directory (tenant) ID
- Client ID: Your app registration's Application (client) ID
- Client Credential: The client secret
- Folders: Top-level folders to access (e.g.,
Inbox, Sent Items)—separate with commas
- Check Recursive to include subfolders
- Click Save and Test
Connecting to Your Destination
AstraDB:
Now that we've connected to multiple data sources, we need somewhere to store the processed, structured data. That's where AstraDB comes in to serve as your AI assistant's memory.
Here's what you need:
- An AstraDB account (create one here if you don't have it)
- A database in your account
- An application token for database access
- A namespace in the database
- The database's API endpoint
- (Optional) A collection name—if you don't specify one, Unstructured will create one automatically
If you need help setting up the database, namespace, or generating your application token, these docs walk through it.
To configure the destination connector:
- In Unstructured, go to Connectors → Destinations → New Connector
- Select AstraDB DB as your provider
- Fill in:
- Name: Something clear (e.g., "AstraDB Enterprise Knowledge")
- API Endpoint: Your database's API endpoint
- Token: Your application token
- Keyspace: Your namespace name
- Collection Name: Leave blank to auto-create, or specify an existing collection
- Batch Size: Keep the default (20) unless you have a reason to change it
- Click Save and Test
Now that you've got your sources and destination wired up, we need to talk about what happens in between. Raw files from Azure, OneDrive, and Outlook aren't RAG-ready. Your assistant can't query a scanned PDF or make sense of a chart buried in a PowerPoint without preprocessing.
That's what the workflow does—it takes those messy files and turns them into something your assistant can actually understand and retrieve from.
Building the Workflow
Setting up the data processing workflow in Unstructured is straightforward once you see how the pieces fit together.
Head to the Workflows tab in Unstructured and click New workflow. Choose Build it Myself and hit Continue. You're starting from scratch, but don't worry—once you see what each node does, it clicks pretty fast.
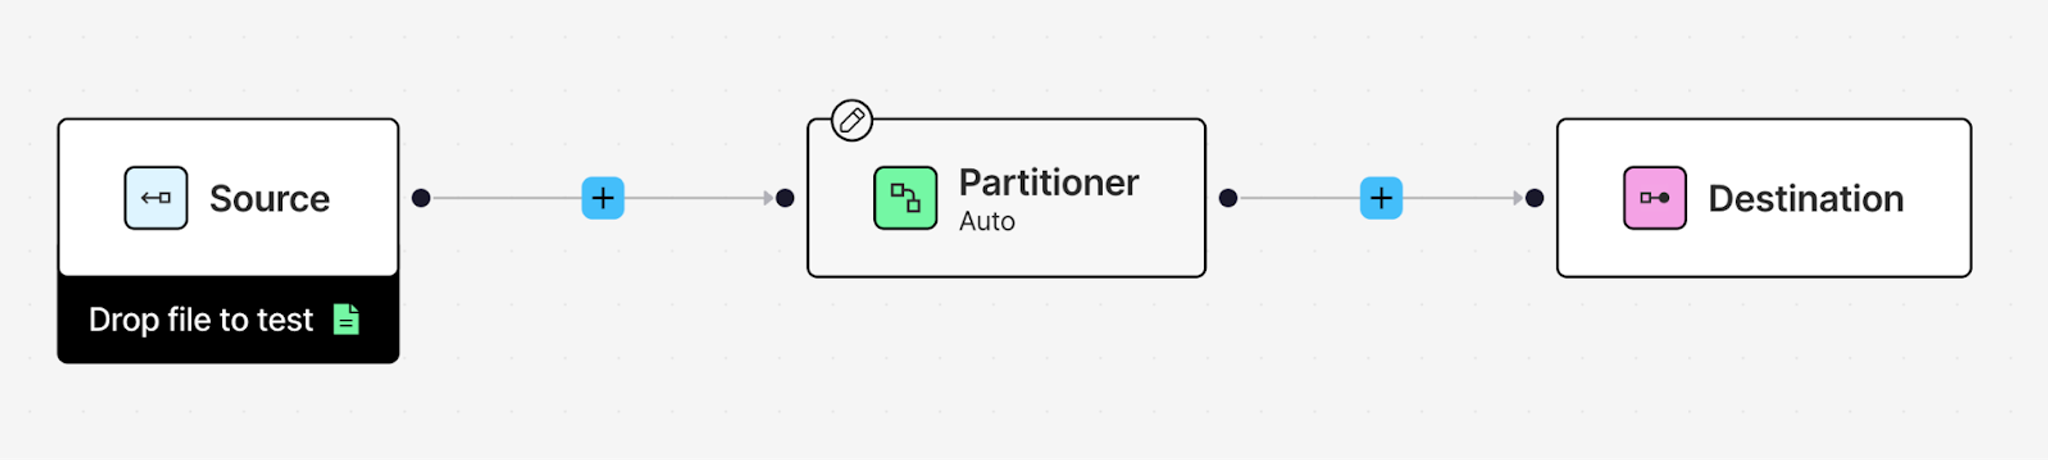
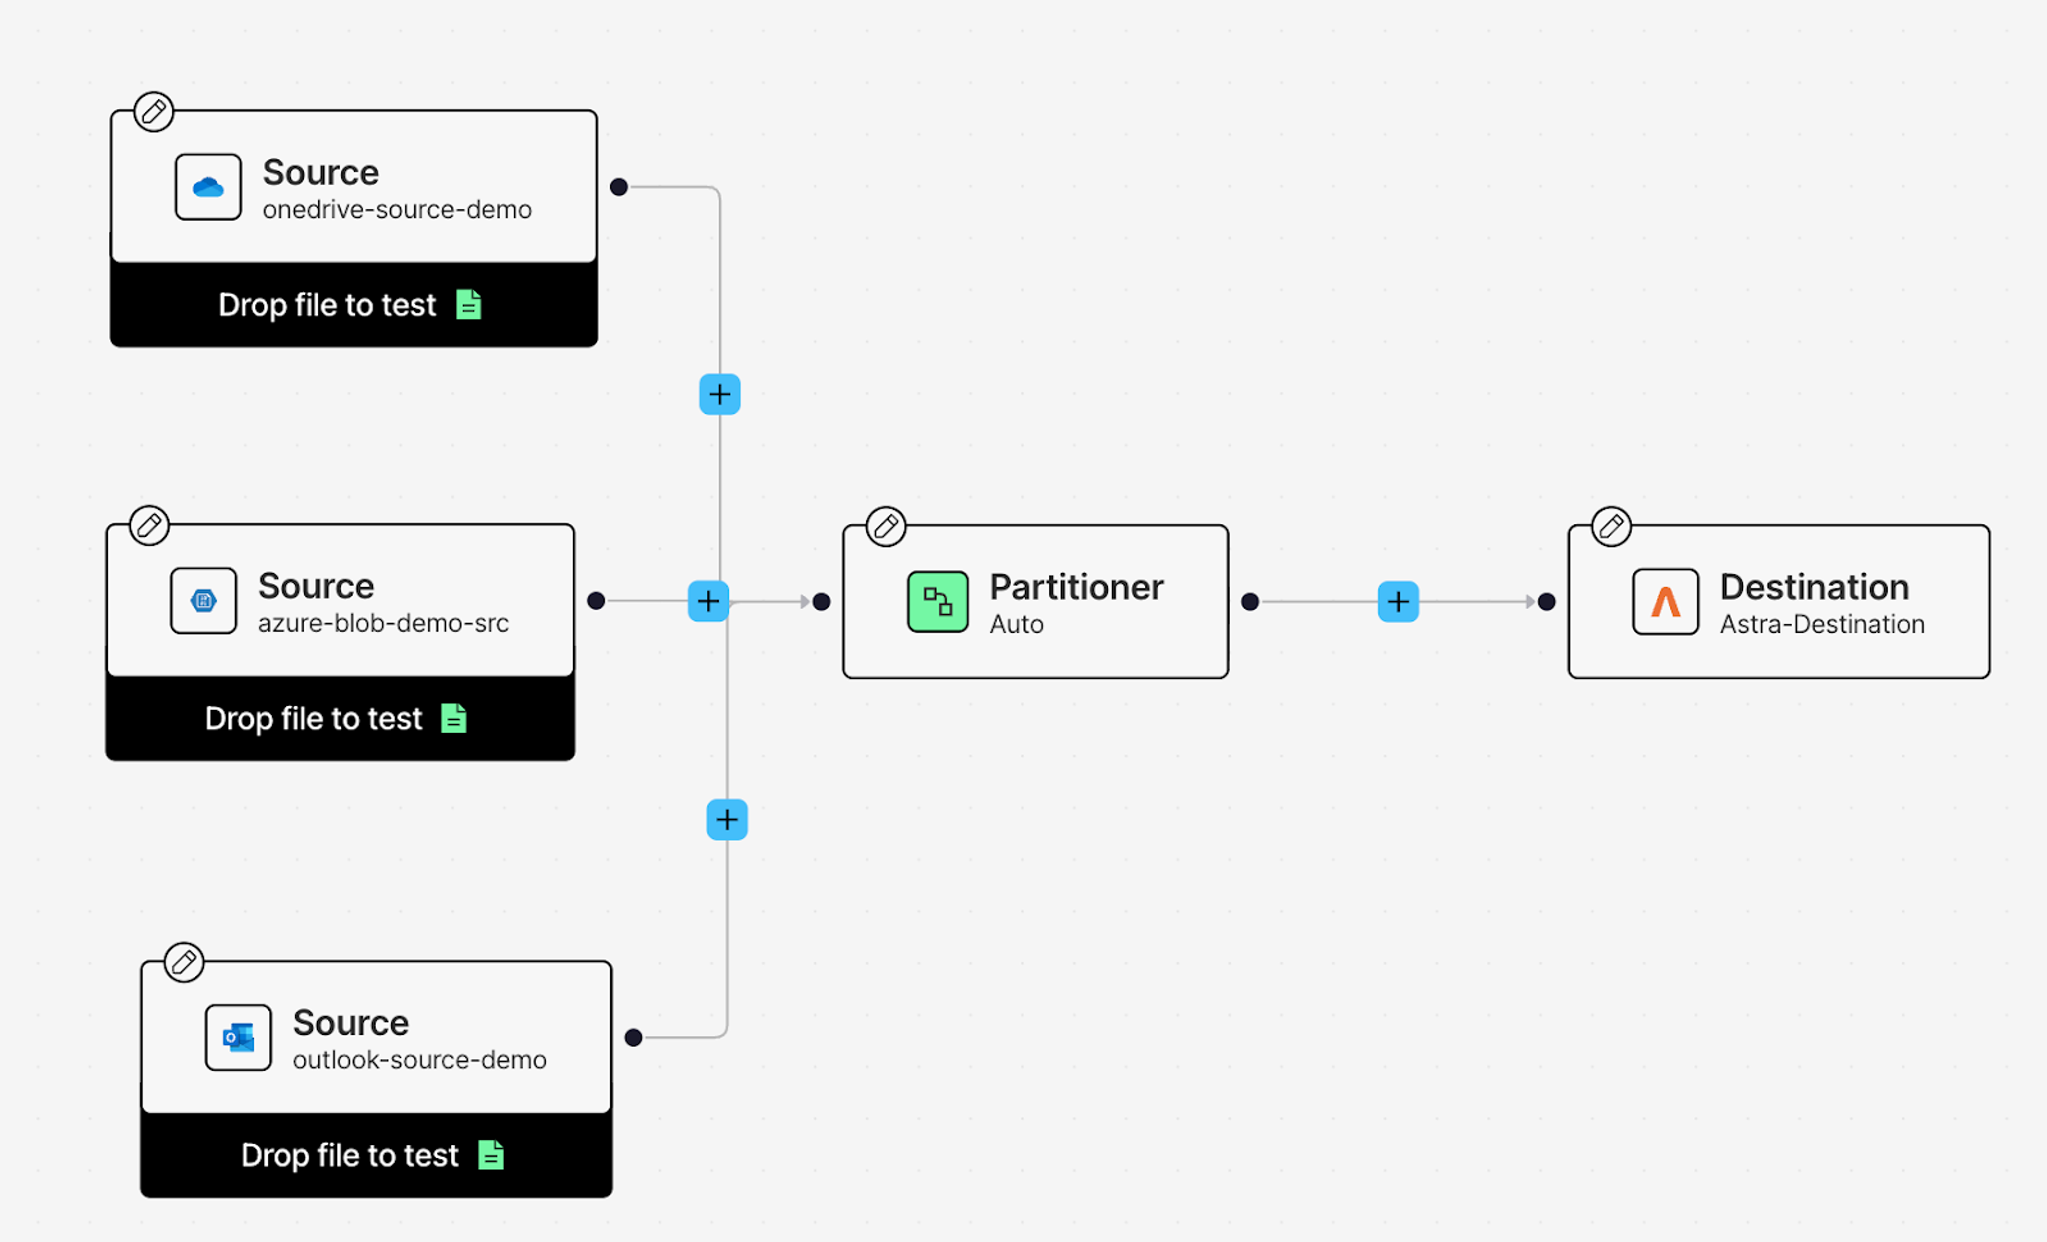
Adding Your Sources
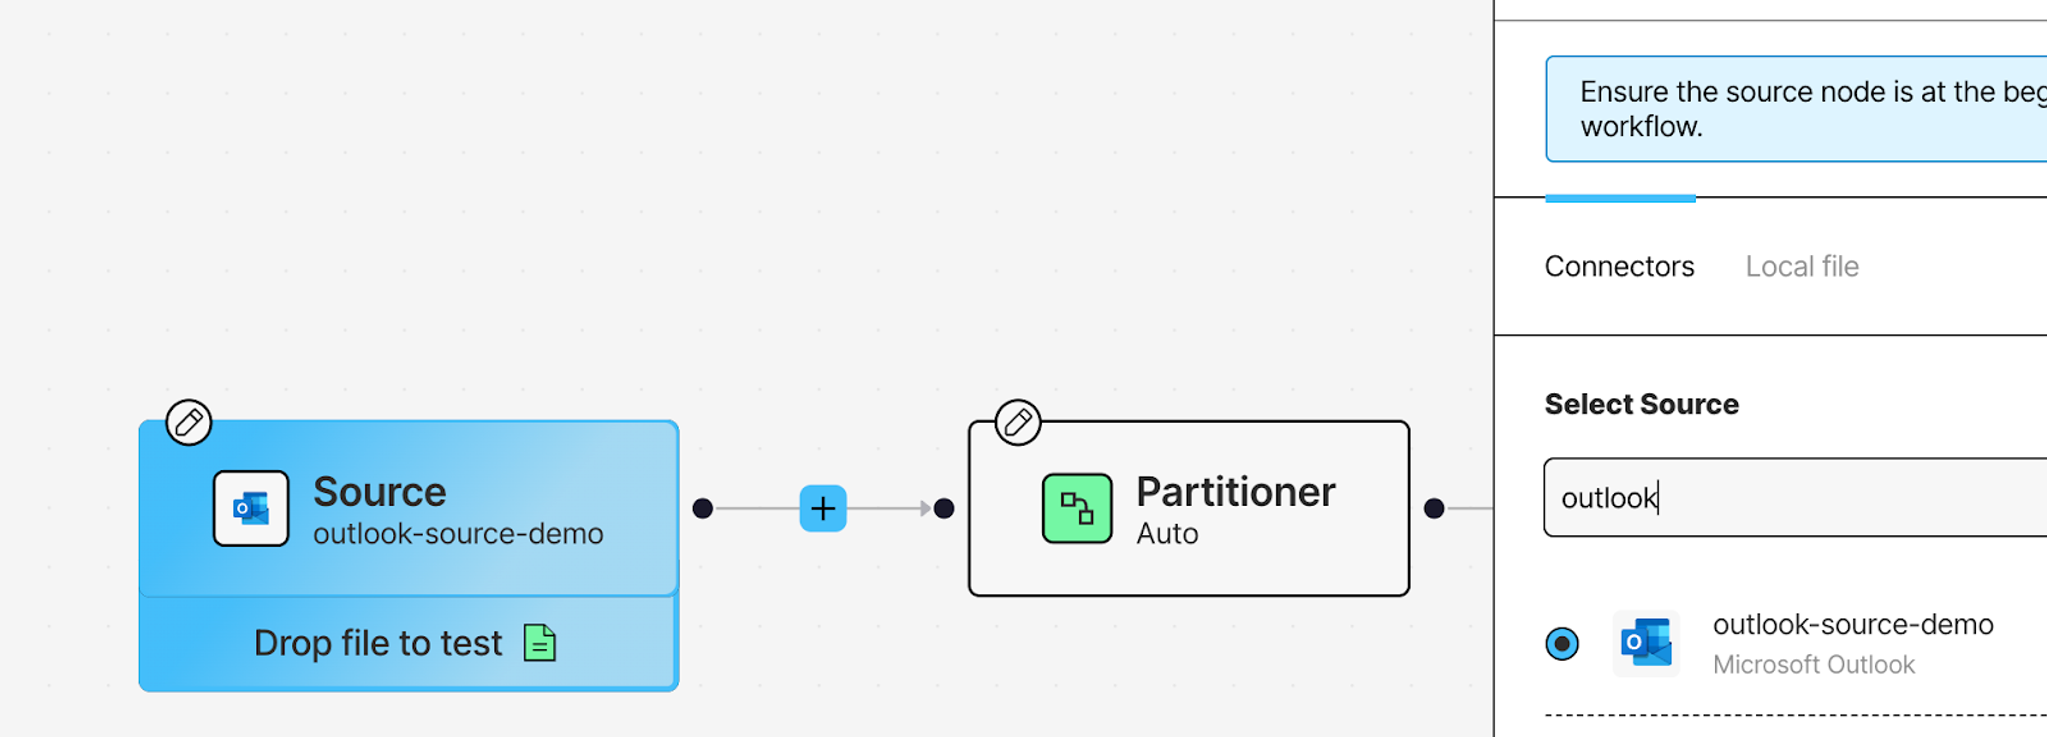
Let's start by connecting your data sources. Click on the Source node, and from the Details tab on your right, add your Outlook Source connector you created earlier.
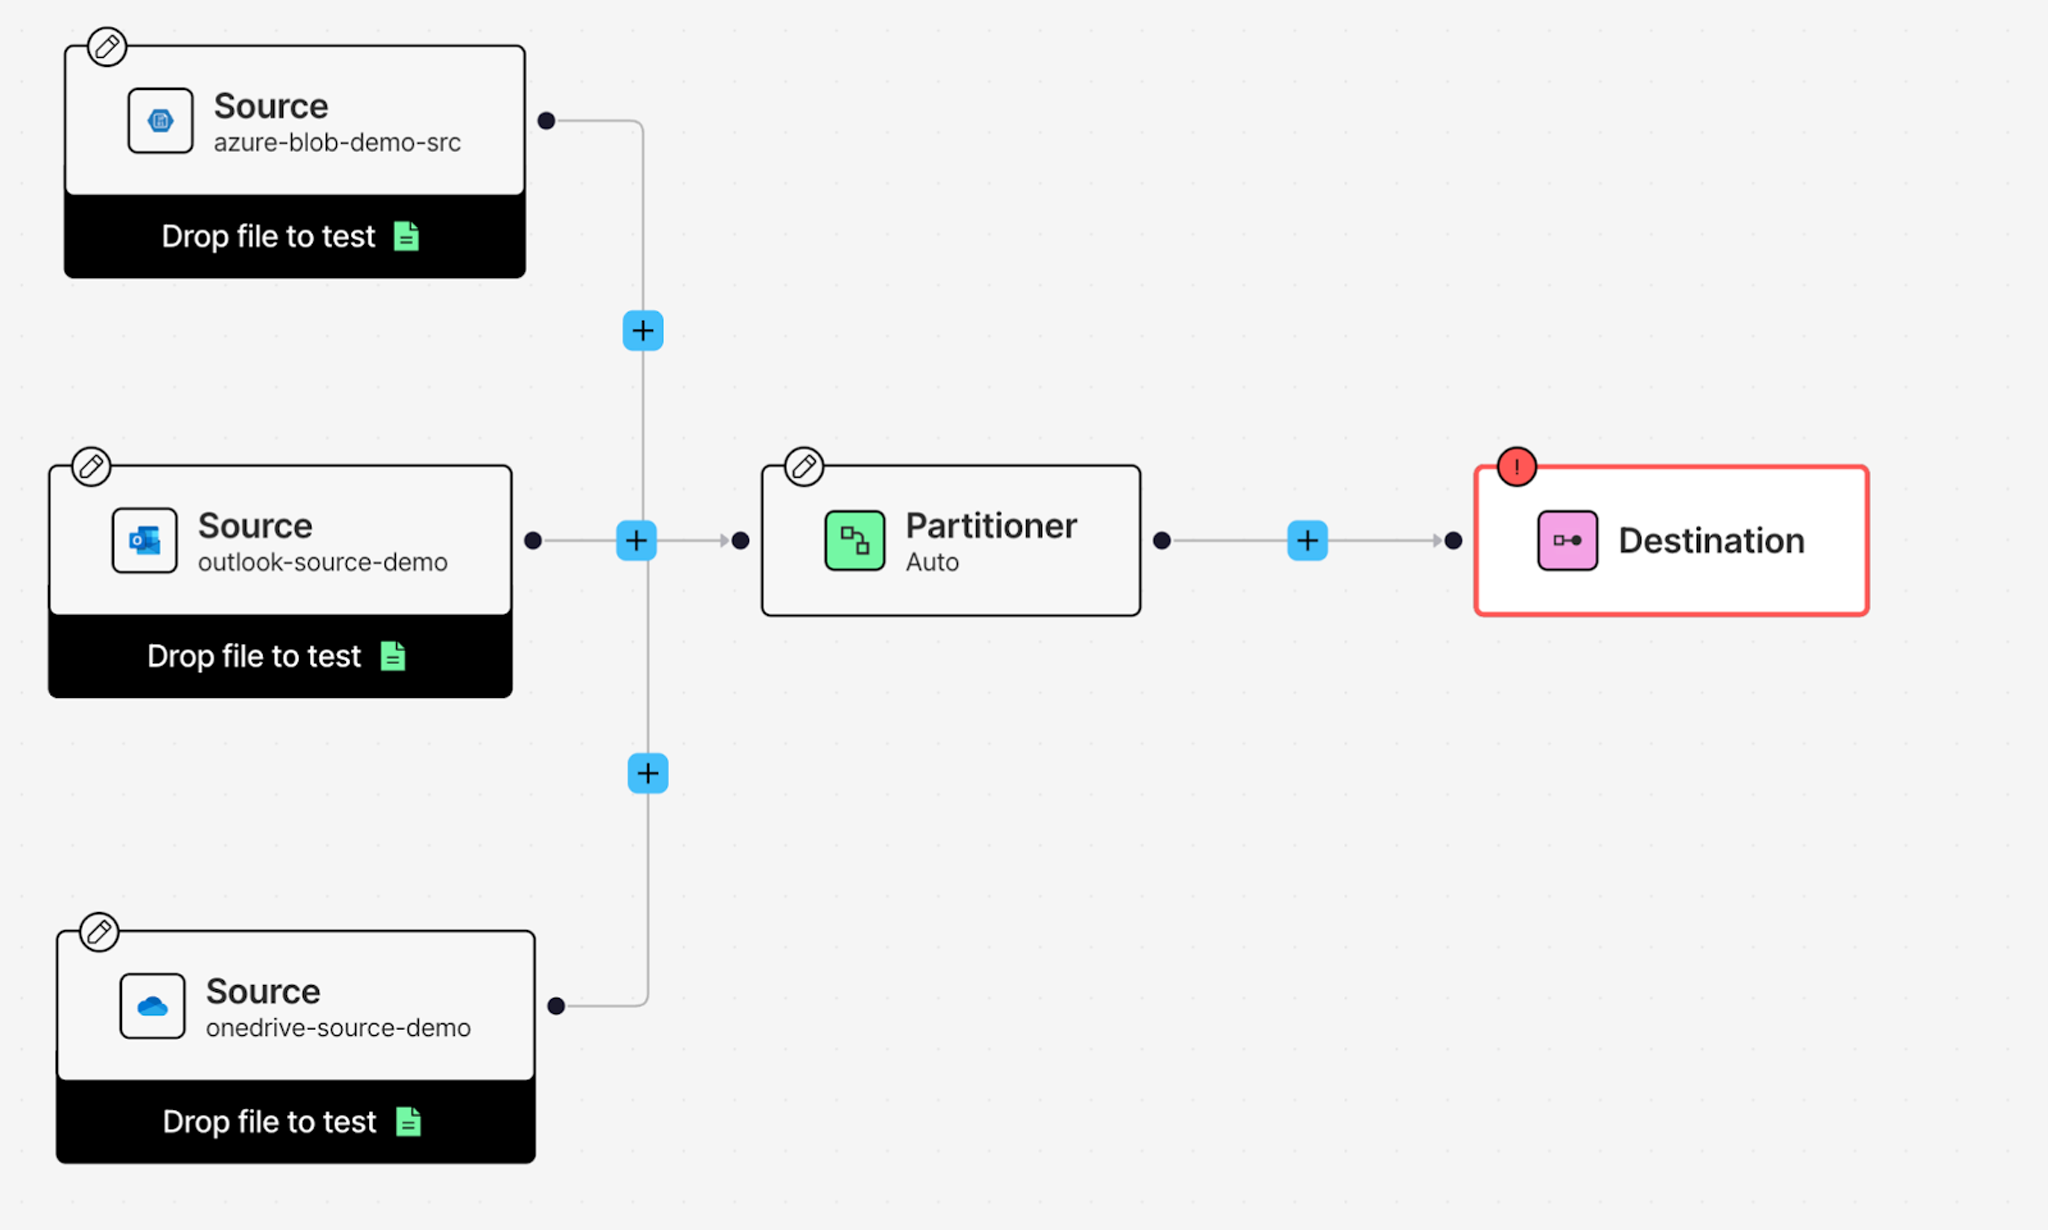
Now add the other two sources: click the + button, hover over Connect, and click Source. This creates another Source node. Click on it and add your OneDrive Source connector from the Details tab. Repeat the process once more for your Azure Blob Storage source.
Setting Up the Destination
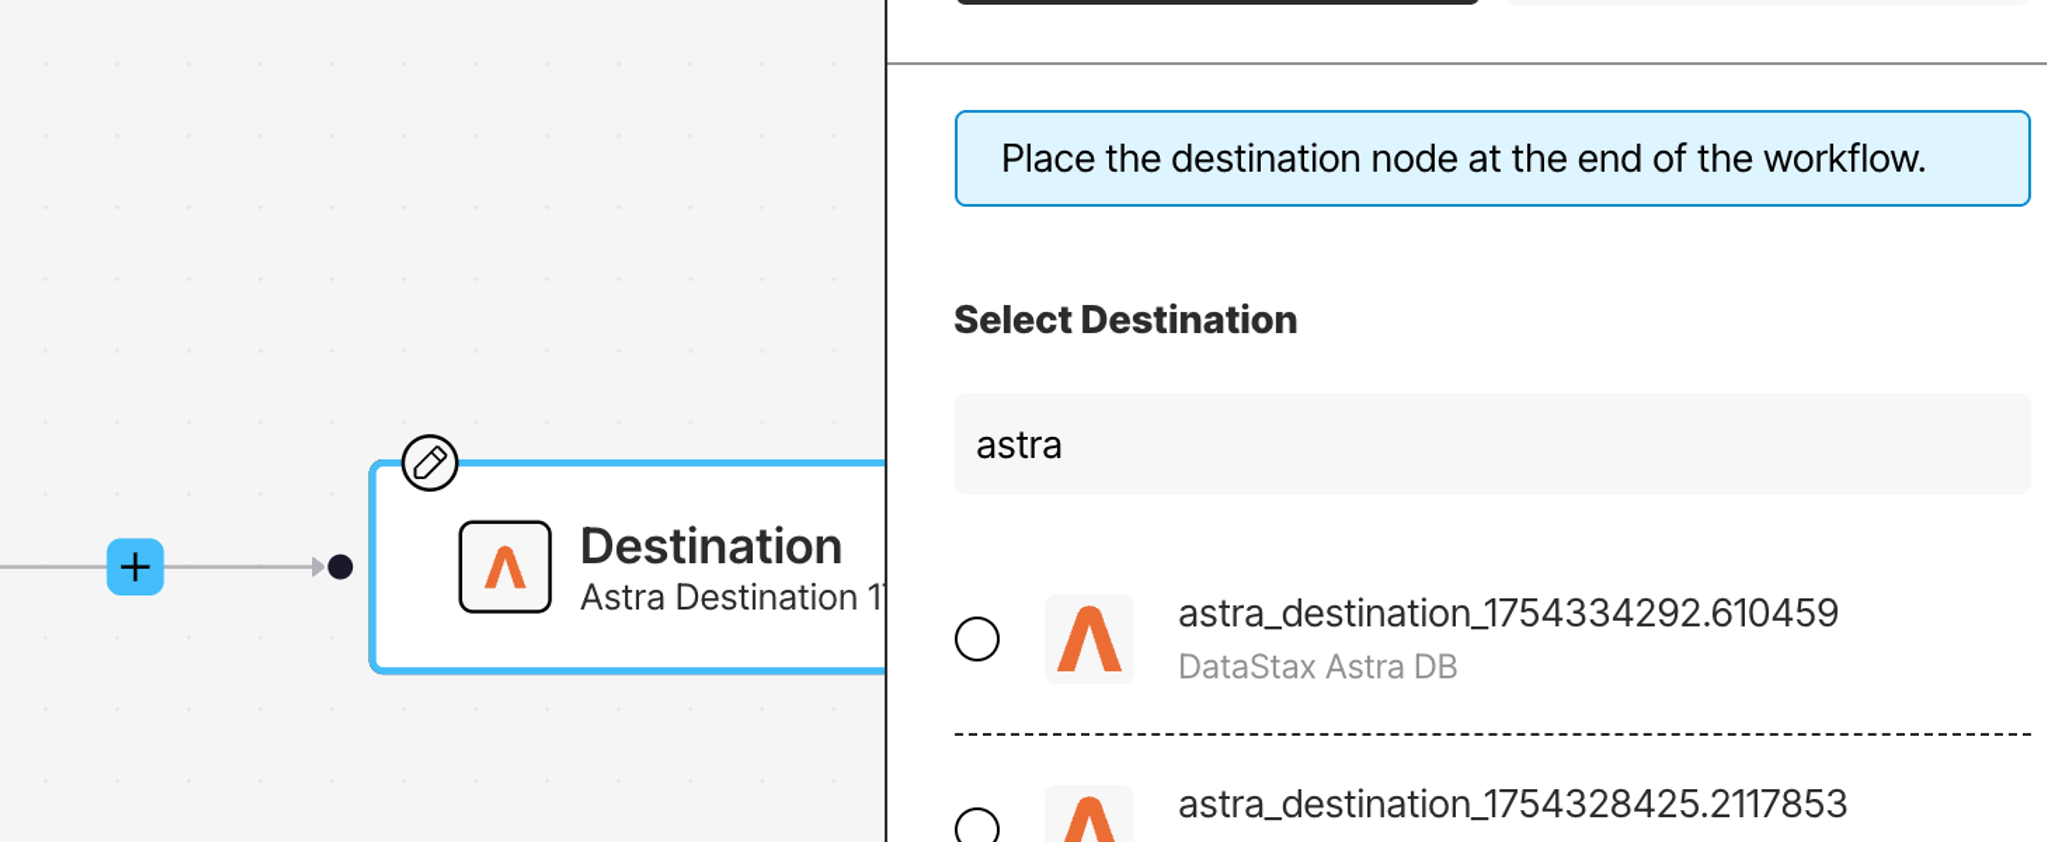
Click on the Destination node at the end of your workflow. From the Details tab, select your AstraDB DB destination connector.
At this point, you've got data flowing in from three sources and a destination ready to receive the processed results. Now let's configure how that data gets transformed.
The Partitioner: Making Sense of Different File Types
Click on the Partitioner node. This is where raw files—PDFs, PowerPoints, emails, Excel sheets—get transformed into structured JSON that downstream nodes can work with.
For this workflow, select Auto as your partitioning strategy. Auto dynamically picks the best approach for each file: Fast for simple text documents, Hi-Res for complex layouts, and VLM for challenging scans or handwritten content. It optimizes for speed and cost while maintaining accuracy.
The Partitioner returns Document Elements—the building blocks of your files. Tables, images, text blocks, all extracted and structured with metadata.
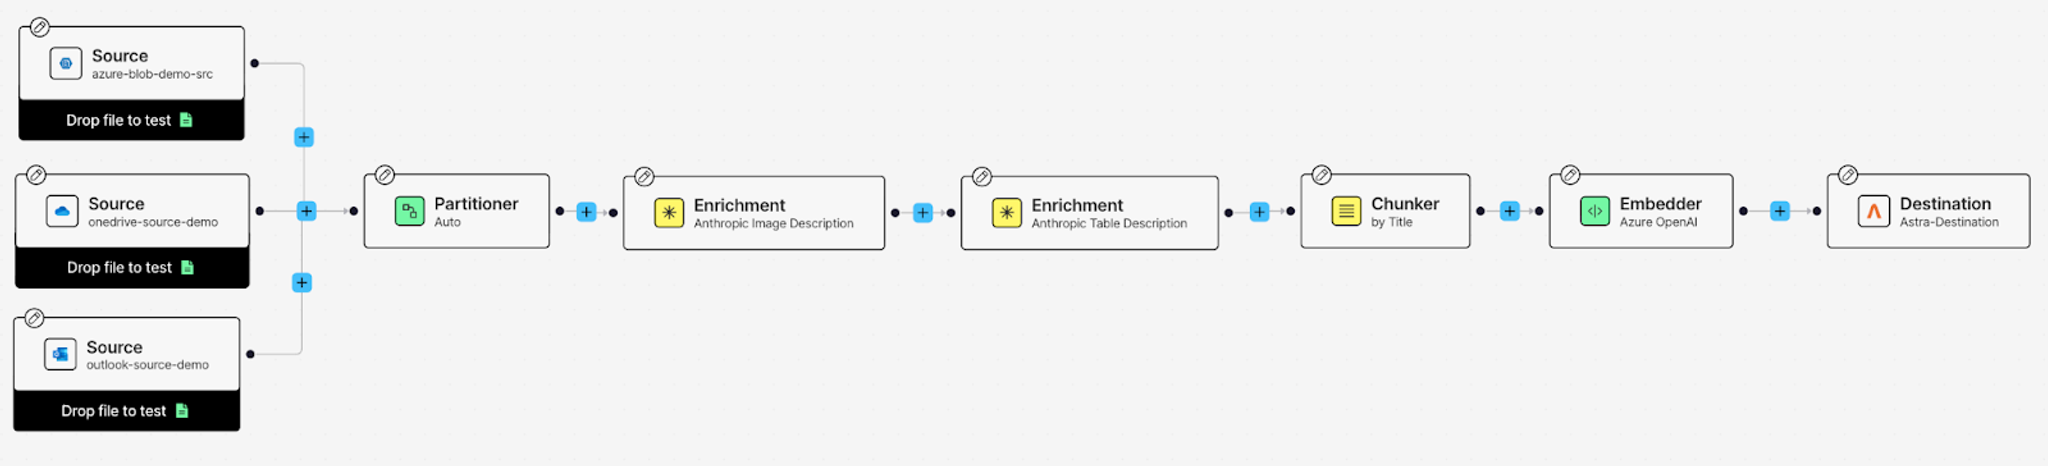
Enriching Your Data
Now let's add enrichments that make your data truly useful for RAG. Click the + button after the Partitioner, hover over Enrich, and select Enrichment.
First enrichment: Image Description
Choose Anthropic Image Description from the Details tab. This enrichment analyzes images in your documents—charts in PowerPoints, diagrams in PDFs—and generates text descriptions of what's in them. Your AI assistant won't just skip over visuals; it'll understand and use them as additional context.
Second enrichment: Table Description
Add another enrichment node the same way. This time, select Anthropic Table Description. This enrichment looks at tables in your documents and generates natural language descriptions of the data. Instead of raw table markdown, your assistant gets context about what the numbers actually mean.

Chunking for Retrieval
Click + after your enrichments, hover over Enrich, and add a Chunker node. This breaks your documents into manageable chunks that fit within embedding model limits and improve retrieval precision.
Select by Title as your chunking strategy. This keeps related content together by using document structure—sections under the same heading stay in the same chunk, preserving context.

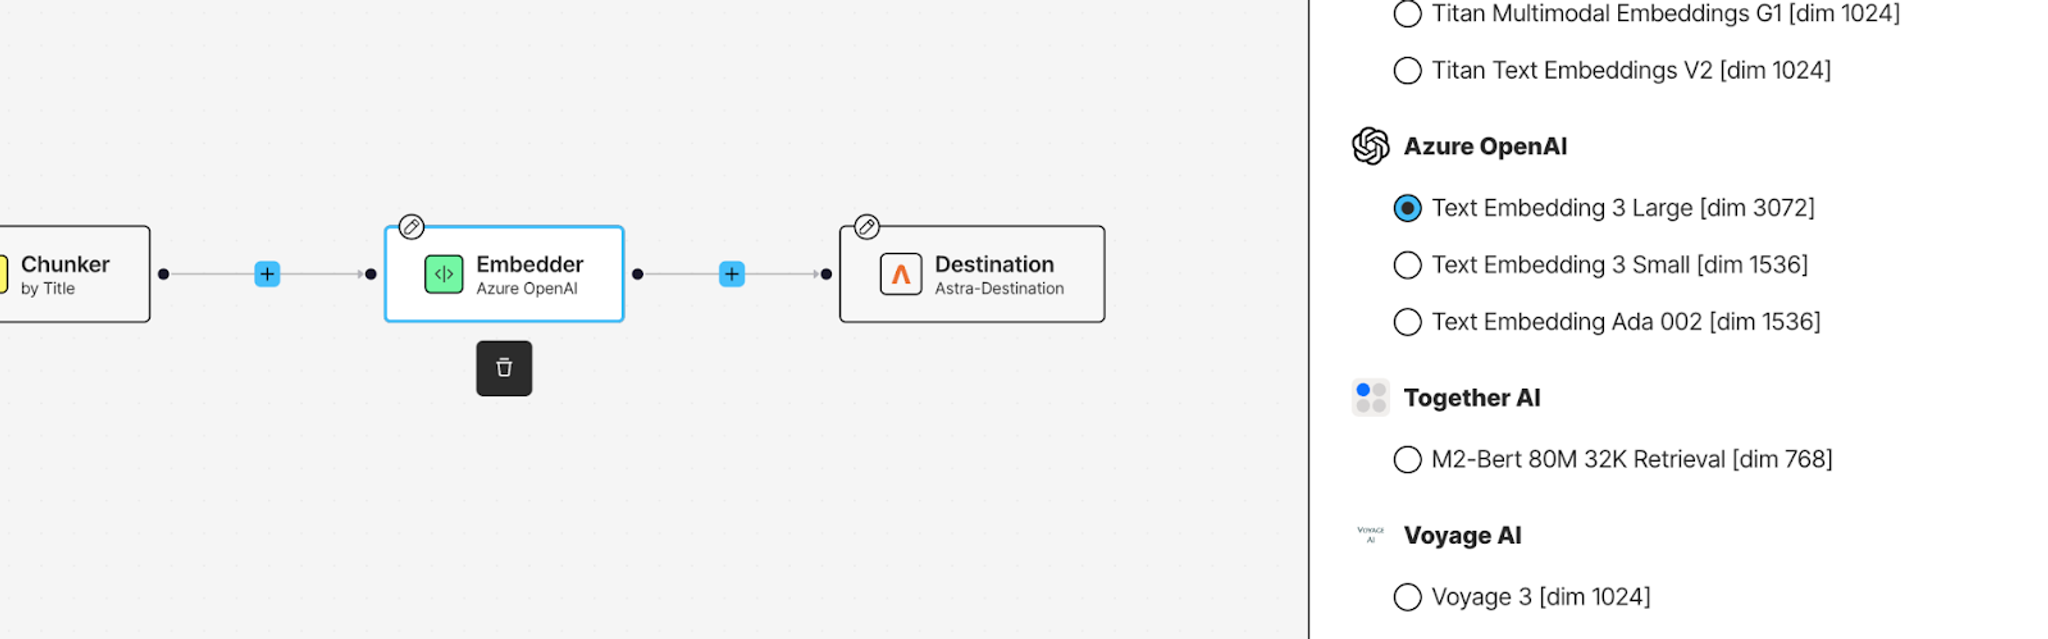
Generating Embeddings
Almost done. Click + after the Chunker, hover over Transform, and add an Embedder node. This generates vector representations of your chunks, which is what makes semantic search possible.
Select Azure OpenAI as your embedding provider from the Details tab, and choose your model. These embeddings will get stored in AstraDB alongside your text, ready for retrieval.
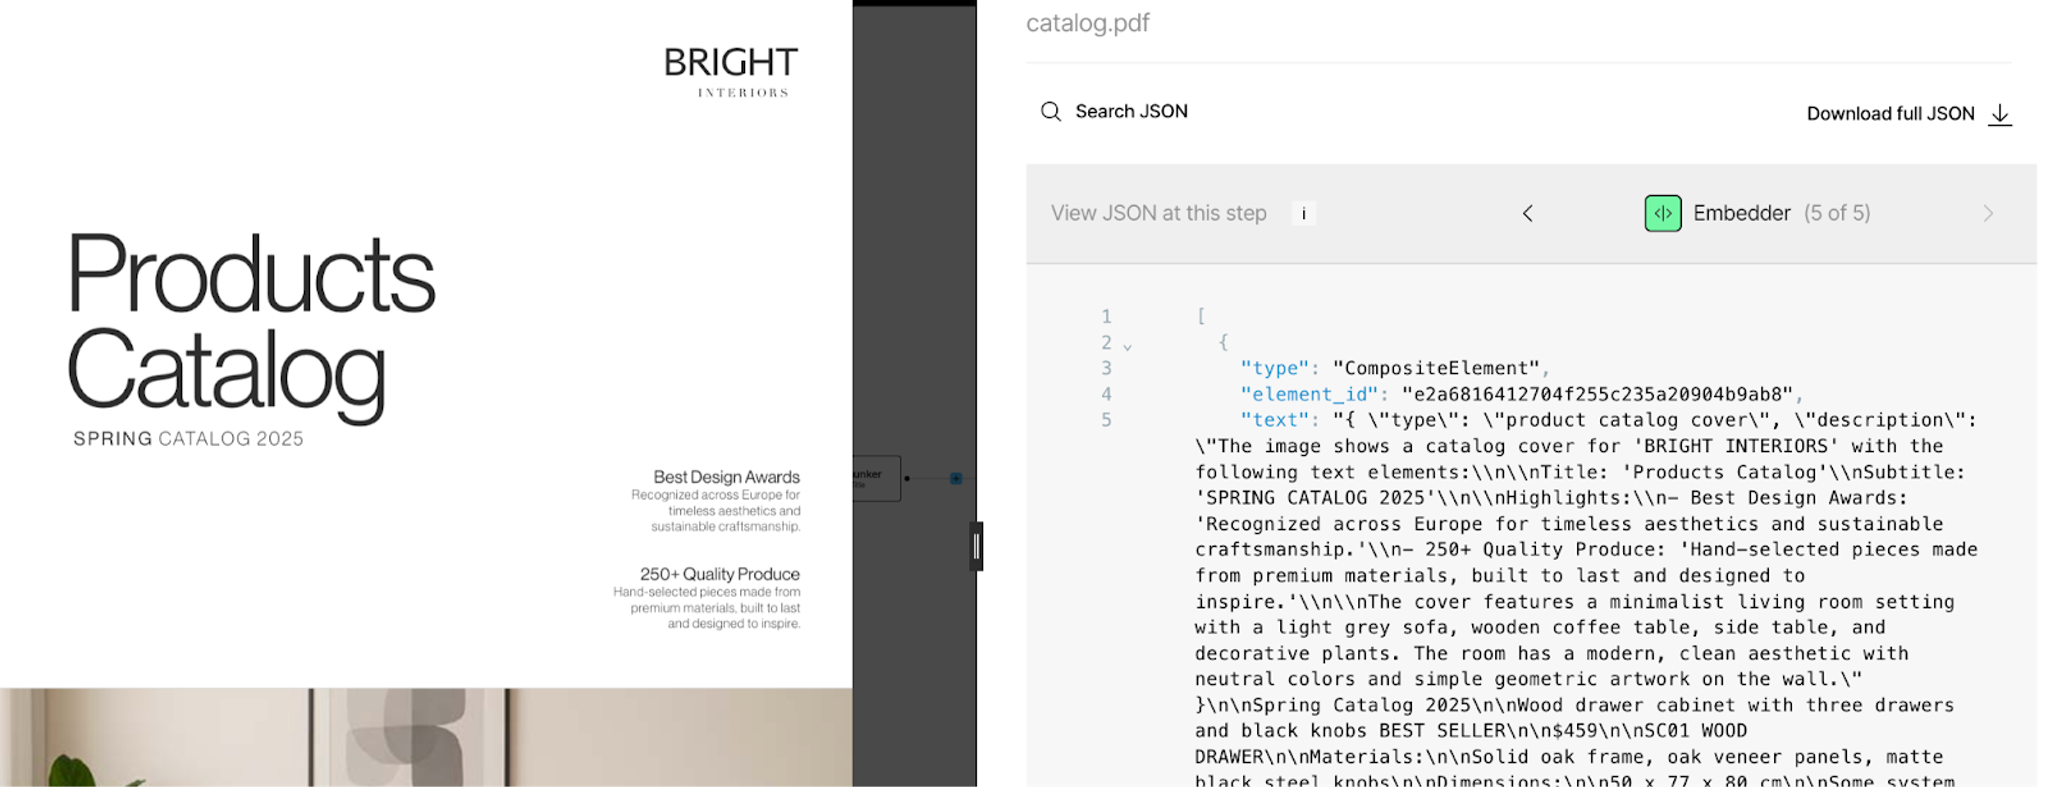
Test Your Workflow
Before running the full pipeline, test it. Drop a sample file into one of your Source nodes (use the "Drop file to test" option). Hit Test and watch your file flow through each transformation. You can inspect the output at each node to see exactly what's happening to your data.
When you're happy with how it's processing, hit Save, then Run to process everything from your sources. The workflow will pull files from Azure, OneDrive, and Outlook, transform them through each enrichment step, and land the processed, embedded chunks in AstraDB.
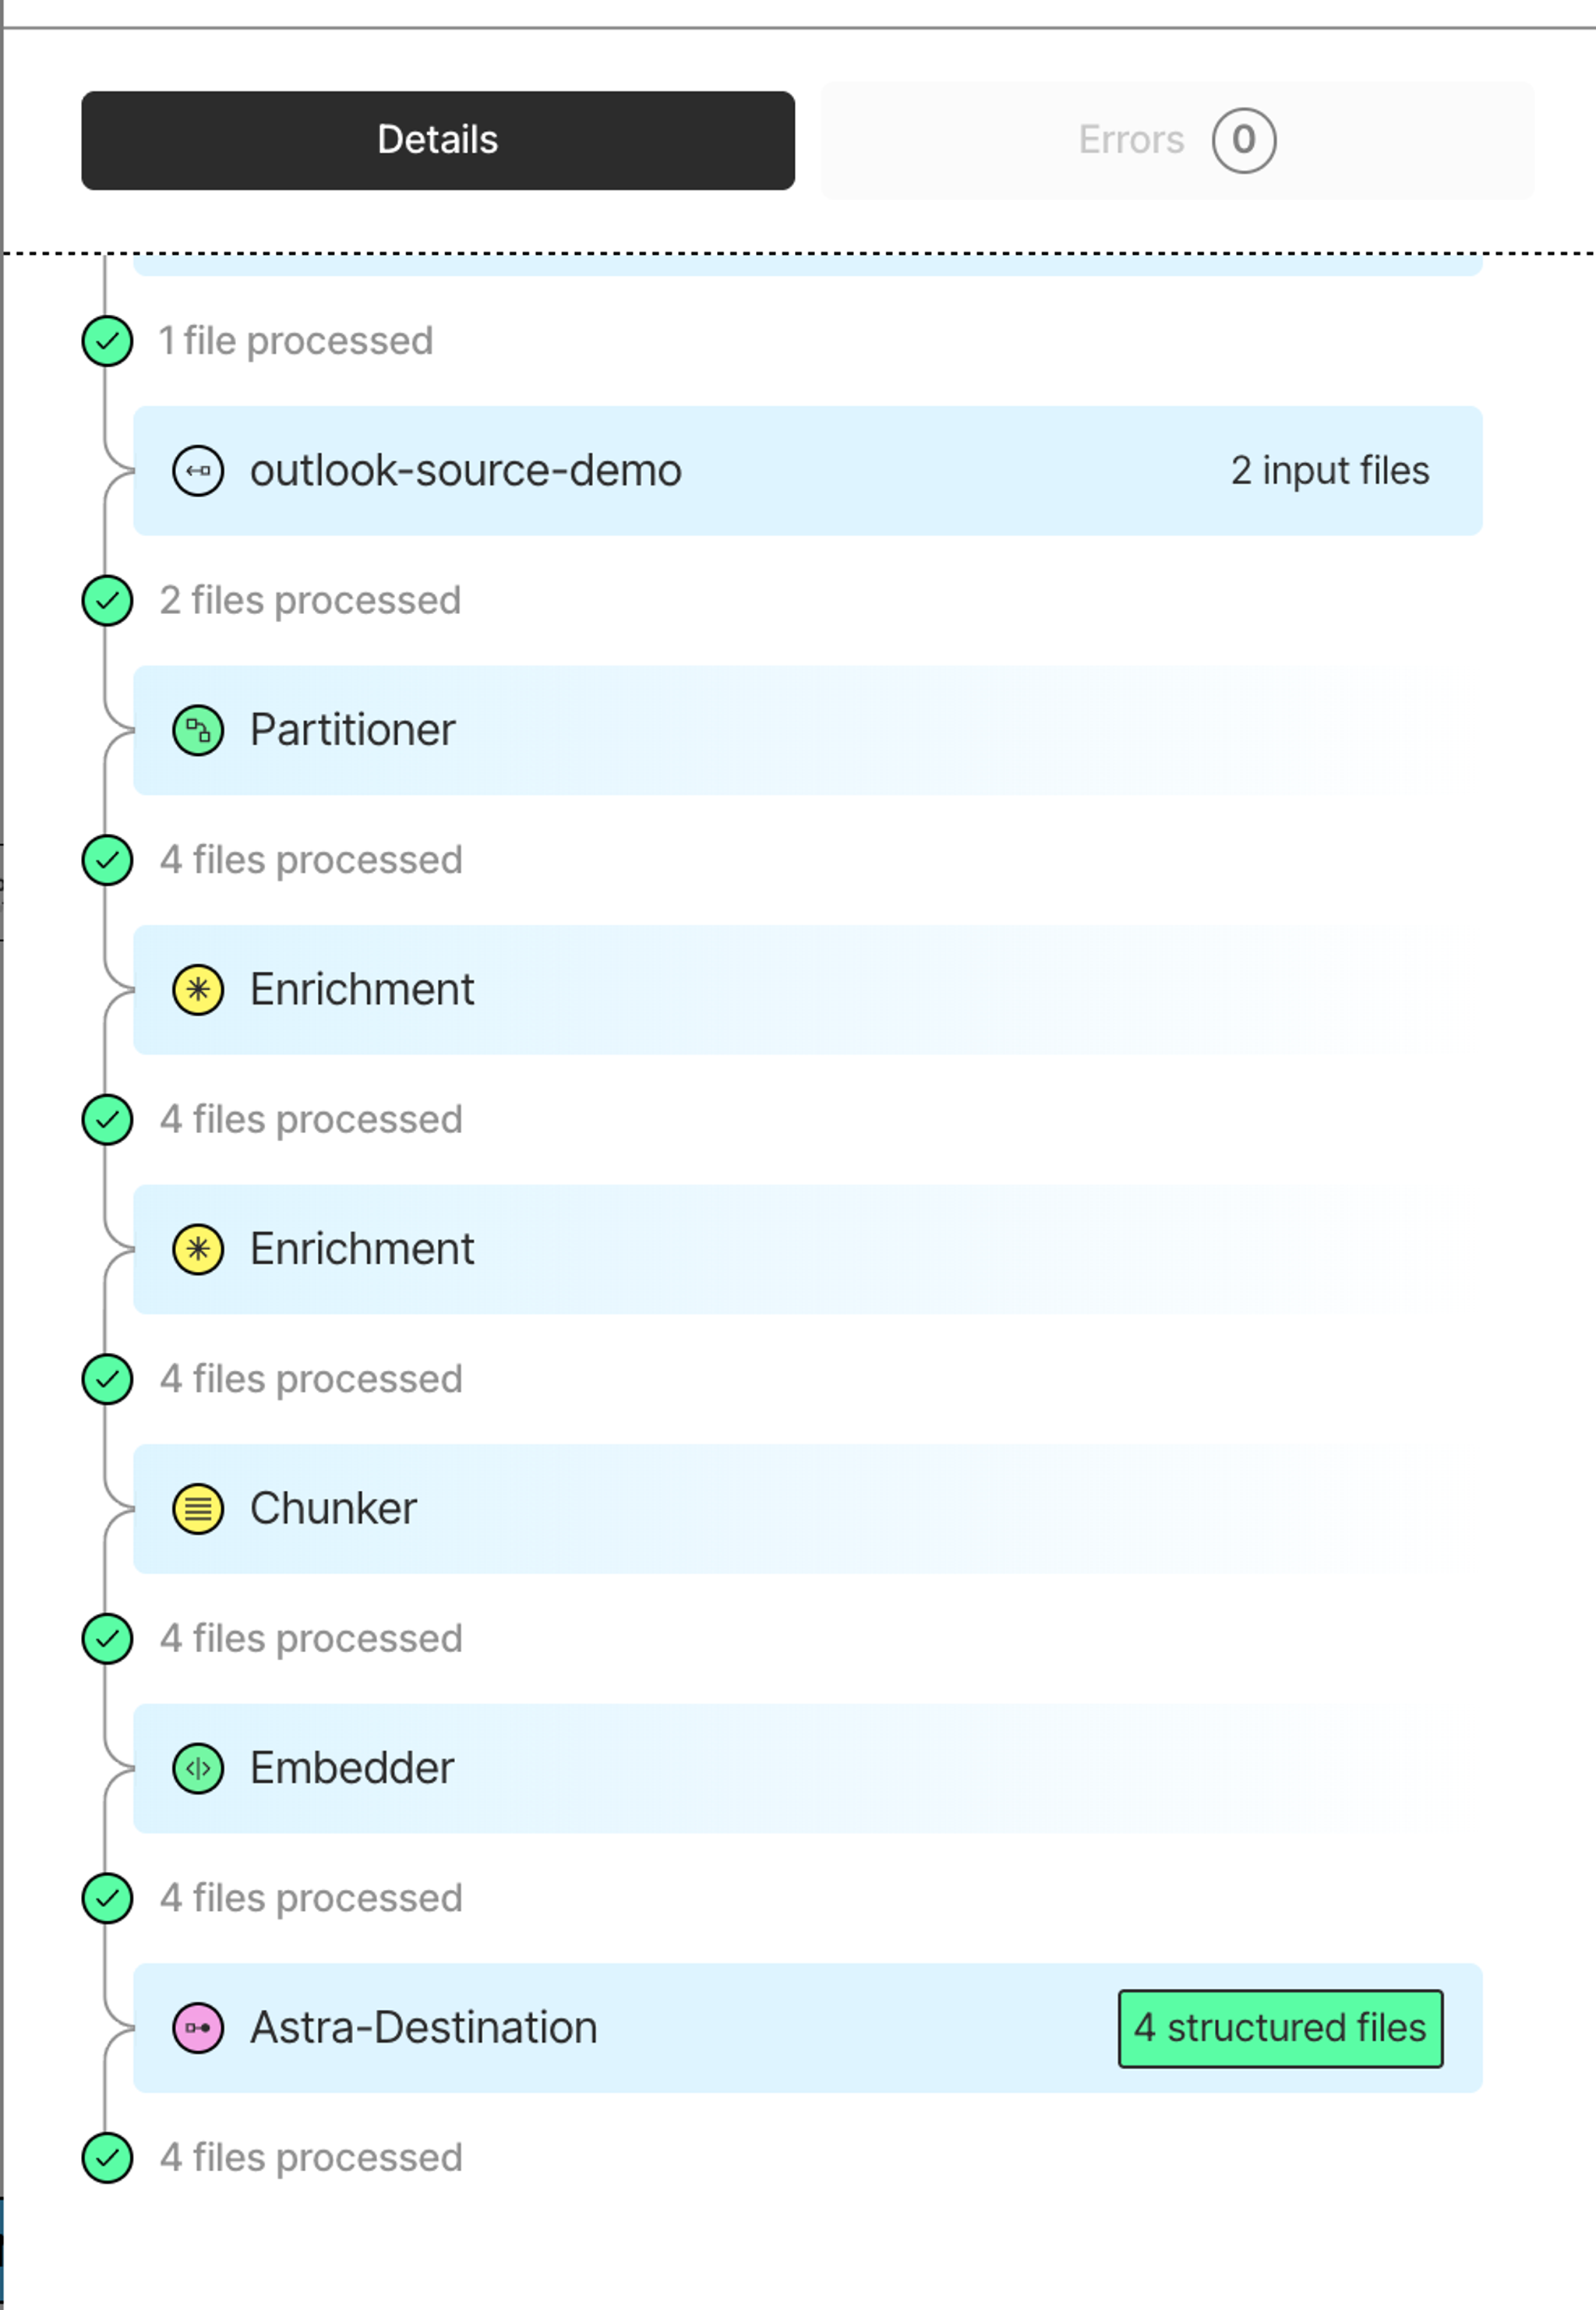
You can check the run details to see how many files were processed, review any errors, and confirm everything landed in AstraDBDB.
Now your data is preprocessed and ready. Next up: building the RAG pipeline that queries it all.
Querying Across Everything: How the System Actually Works
You’ve done the hard work already: you’ve connected your data sources, processed every file with Unstructured, and loaded enriched chunks into AstraDB. The final step is simple—ask a question.
You can see this in action in this notebook. It walks through how a single query gets embedded, semantically matched, and passed through an LLM while being grounded in your content.
So what happens when you run a real question?
When you run...
ask_question("What did we promise the healthcare client?")...here’s the chain of events under the hood:
- Embedding the query Your question is converted into a dense vector using
text-embedding-3-large. - Vector search across stored chunks AstraDB finds the top‑k embeddings that match your query regardless of which file they came from. It doesn’t grab whole documents, just the most relevant snippets.
- Source metadata is included Each returned chunk carries metadata: the file name, page number, and any enrichments (table summaries, image captions, etc.).
- Synthesis by the LLM The snippets and metadata feed into the LLM. The model reads across all sources, stitches them into a coherent answer, and returns it to you in plain language.
So you get answers that may draw from a PDF, an email, and a slide deck all in one shot.
Why This Works: One Universal Format
The reason this system stays stable across PDFs, PPTs, Excel models, and emails is because Unstructured doesn’t treat each file as a special case.
Instead, everything is transformed into a shared internal format: a list of structured elements with type, metadata, and enrichments.
- A text block in a PDF? → A
textelement with page number and coordinates. - A chart in a PowerPoint? → An
imageelement with an AI-generated description. - A revenue table in Excel? → A
tableelement enriched with a natural language summary. - An email thread? → Multiple
textelements with sender, date, and thread metadata.
Downstream, the retriever and the LLM don’t need to know where any of this came from. They just see consistent, enriched context.
That’s the beauty of this approach: one workflow, one system, one universal format—no need to build a separate pipeline for every file type. It just works, whether it’s PDFs, PowerPoints, Excel sheets, or emails.
You now have a working system that can answer questions across your entire enterprise content stack by pulling from contracts in Azure, PowerPoint decks in OneDrive, customer emails in Outlook, and more.
And the best part? You didn’t have to write custom logic for each file type. Unstructured handled the hard parts — parsing, enriching, and structuring every file into a single universal format. AstraDB made it searchable.
What you’ve built is a solid foundation for enterprise RAG.
Where You Can Take This Next
Want to go further? Here are a few ideas:
- Add observability — Track query volume, source usage, retrieval quality.
- Extract domain-specific entities — Add NER enrichment to identify and tag key entities—customer names, project codes, product lines—adding more filterable, searchable metadata that your assistant can query by.
- Improve the UX — Wrap this into an internal chat app, Slack bot, or web-based assistant.
RAG is just a pattern. What makes it powerful is the data you give it and how you prepare it.
Ready to build your own?
Sign up for a free Unstructured account, connect your first source, and start building the kind of assistant your company actually needs. You’ll go from scattered knowledge to systematized answers faster than you think.
FAQ
What is Retrieval Augmented Generation (RAG), and why does it matter for enterprise knowledge management?RAG is a technique that grounds large language model responses in your own data by retrieving relevant content at query time rather than relying solely on the model's training. For enterprises, this means an AI assistant can answer questions using your actual contracts, emails, and presentations instead of generating plausible-sounding but unsupported responses. It's particularly valuable when knowledge is scattered across systems and formats that a standard search tool can't handle well.
Why is building a multi-source RAG pipeline harder than it sounds?Most RAG tutorials assume clean, consistently formatted text from a single source, but enterprise data rarely works that way. Real-world pipelines have to handle PDFs with complex layouts, presentations with embedded charts, spreadsheets with financial models, and email threads with conversational context, all living in different storage systems. Each file type and source introduces its own parsing challenges, and without a unified processing layer, you end up building and maintaining separate logic for each one.
How does chunking strategy affect the quality of RAG retrieval?Chunking determines how documents are split before being stored as embeddings, and poor chunking is one of the most common reasons RAG systems return incomplete or misleading answers. Splitting text arbitrarily by character count can break sentences mid-thought or separate a heading from the content it introduces. Structure-aware strategies, like chunking by title or section, keep semantically related content together and produce more coherent, retrievable units.
How does Unstructured handle file types like PowerPoints and scanned PDFs that contain visual content?Unstructured extracts content at the element level, meaning charts, diagrams, and images are identified as distinct elements rather than ignored or treated as blank space. When image and table enrichments are added to a workflow, Unstructured uses vision models to generate natural language descriptions of that visual content, making it retrievable through semantic search. This means a chart on slide 47 of a sales deck becomes queryable context, not a gap in your knowledge base.
What does the Auto partitioning strategy in Unstructured actually do?Auto mode dynamically selects the most appropriate processing approach for each file based on its complexity. Simple text-heavy documents are processed with a fast extraction method, complex layouts with tables and multi-column formatting use a high-resolution model, and challenging content like scanned pages or handwritten notes is routed to a vision-language model. This means you get accurate extraction across a mixed file set without manually configuring a strategy for each document type.